Table of Contents

Last updated Nov 03, 2023
The Perfect Golf Grip: An Easy, 5-Step Guide (with pictures)
Learn all the different possibilities for the golf grip, and how they may be affecting how powerful your swing is.
Written By: Zach Gollwitzer
Posted in: Golf Swing Fundamentals
We will be starting off the setup chapter of the instructional series with the grip, because not only is this our only connection to the golf club, but it is also one of those topics in which everyone seems to have a different opinion. I'm not going to tell you the right grip here, but will give you everything that you need to know in order to decide on the proper one for your own game.
Tiger Woods once said that "you should feel as if you were born to hold a golf club." Easy to say coming from someone who actually was born to hold a golf club, but I think we can all take something away from this piece of advice. Whatever grip you do choose, it is important to practice it over and over again until holding that golf club feels like the manufacturer made that grip to fit your hands. When first starting out in golf, achieving this feeling is impossible. Nobody on earth can pick up a golf club and immediately grip it with comfort. For those of you in this early learning stage, I suggest keeping a golf club around the apartment or house, and pick it up and grip it throughout the day. If you do this over the course of a few months, I can assure you that the grip will begin to feel better in your hands.
But what is the best way to hold a golf club??
For a full golf shot, a golf grip can be held in primarily 3 different structures, 3 different orientations, 3 different power positions, and 2 different left thumb arrangements.
The 3 Structures
These are most commonly referred to as the Baseball Grip, the Vardon Grip, and the Overlap Grip. The majority of professional golfers (and golfers in general) use either the Vardon or the Overlap grips, as they generally provide the most stability.
Baseball Grip - This is where the hands do not overlap in any way. Those players with small hands might find this comfortable, but I still would not recommend it:
Vardon Grip - Although I don't want to bring any bias to this explanation, the Vardon Grip may (without any statistical evidence) be the most popular grip in golf. It surely seems that the majority of professionals use this grip. This grip is formed by resting the right pinky somewhere between the pointer and middle finger of the left hand:
Interlock Grip - Notably used by Tiger Woods and his boyhood idol Jack Nicklaus, this grip is great for those with smaller hands, but not exclusive to those with small hands. I used this grip for several years, and after switching to the Vardon grip, I personally find this one more difficult to properly execute. It is distinguished by the right pinky interlocking between the pointer and middle fingers of the left hand:
The 3 Orientations
There are also three basic orientations in which the three structures can rest in. These are often referred to as Strong, Neutral, and Weak. Please note that in the 2 lever model, we are assuming a neutral grip, and any deviation from this will simply alter the look and feel of the left wrist throughout the golf swing, but not to the detriment of the golfer if he/she properly accounts for this deviation.
Many instructional texts will say something about the "v's" formed between the thumbs and the index fingers, and how different orientations make those v's point to different places on the upper torso. I personally find this method useless due to the inconsistency the human eye to perceive where those v's are actually pointing. Instead, I prefer to determine the strength or weakness of a grip based on the left hand's relationship to the grip. Although the right hand is important to the grip, I assume that regardless of the left-hand orientation, the right hand will always sit in a neutral position on the grip. This is because, during the downswing, unnecessary complications arise when the right hand is in a strong or weak position. Yes, a golfer could alter his right-hand orientation to a strong or weak position successfully, but for simplicity's sake, I will assume that the right hand is always going to be neutral. To achieve a neutral right-hand position, the right palm should be facing the target, regardless of the left-hand grip orientation.
Now that we have established that requirement, let's look at the three different orientations in detail. I suggest that when practicing your grip, you draw a small Sharpie dot on your glove where the snuffbox of the left wrist is located. In the pictures below, you will see this Sharpie dot in green on my glove. Note that these orientations are irrespective of the structure of the grip. One can achieve all three of these orientations with all three structures. Also, when describing the three orientations, I am assuming that the club-face is perfectly square in an impact position (shaft leaning slightly forward), and the relative snuffbox location is based on this position.
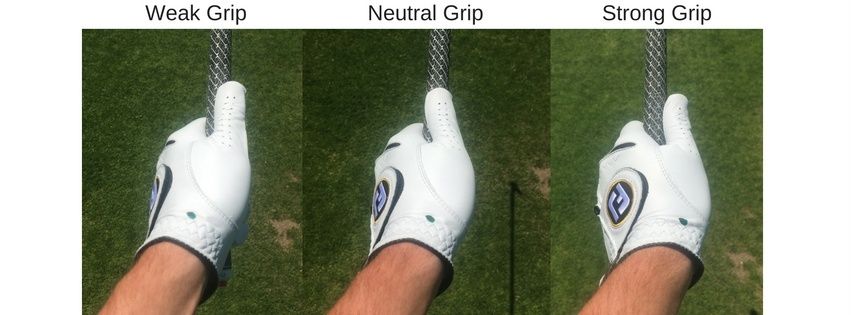
Strong Grip (right photo) - The strong grip is formed when the snuffbox of the left wrist is located to the right of the golf shaft. We call it a strong grip because if you were to aim the clubface at the target, take this grip, and then lift your left arm straight out in front of you with the back of your left-hand perpendicular to the target, the clubface would be closed.
Neutral Grip (middle photo) - The neutral grip is formed when the snuffbox of the left wrist is located on top of the golf shaft. We call it a neutral grip because if you were to aim the clubface at the target, take this grip, and then lift your left arm straight out in front of you with the back of your left-hand perpendicular to the target, the clubface would be square.
Weak Grip (left photo) - The weak grip is formed when the snuffbox of the left wrist is located to the left of the golf shaft. We call it a weak grip because if you were to aim the club face at the target, take this grip, and then lift your left arm straight out in front of you with the back of your left-hand perpendicular to the target, the clubface would be open.
Although none of these grip orientations are wrong, the golfer will have to make the least amount of adjustments when taking the neutral grip, and therefore I recommend that most golfers attempt to achieve this neutral grip. Additionally, I would like to mention that the grip "strength" has nothing to do with power. Players with strong grips tend to hit it farther than those with weak grips, but this is because a strong grip generally results in a de-lofting of the club at impact, which results in more distance. The raw power in a golf swing is independent of its grip strength. That being said, there are three "power positions" which do affect the power of a golf swing:
3 Power Positions
Now we are getting into some of the more advanced concepts of the grip, but it is still important for all golfers to understand these concepts.
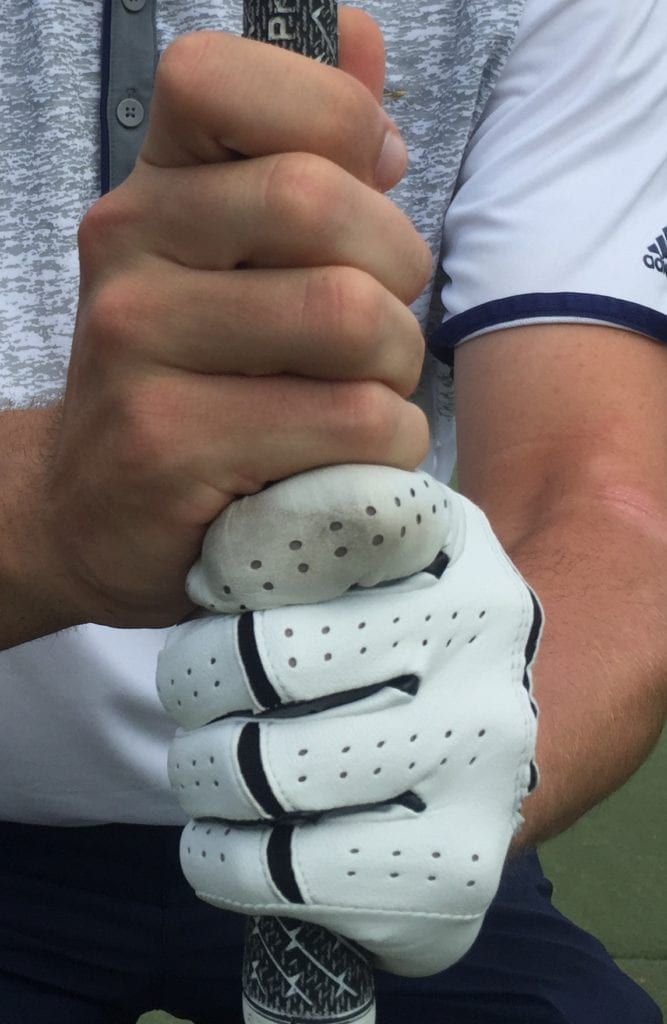
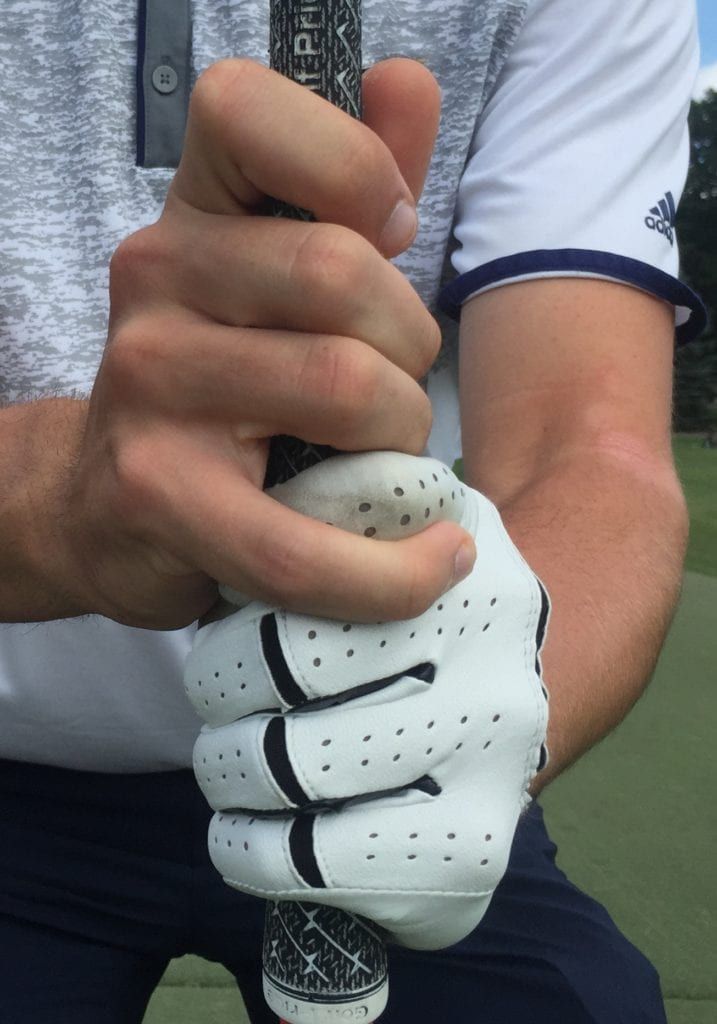
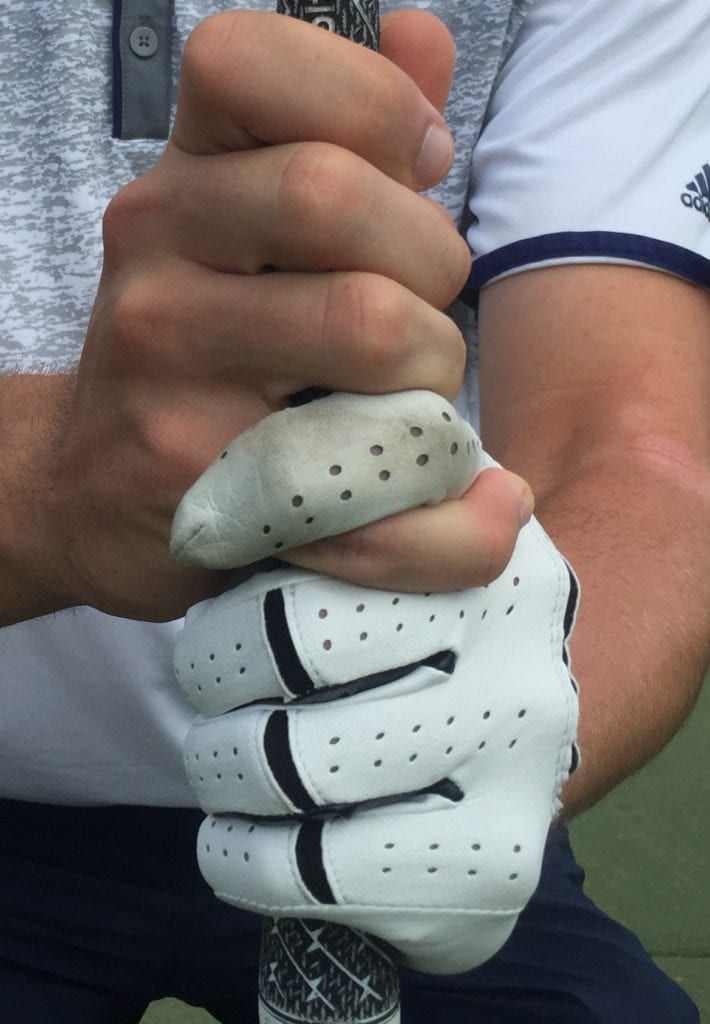
Regardless of what structure and orientation the golfer chooses to use for his/her grip, there are also 3 different ways to place the left hand on the grip while keeping the structure and orientation constant. In order to understand these, I recommend that you draw small Sharpie marks in the locations shown below:
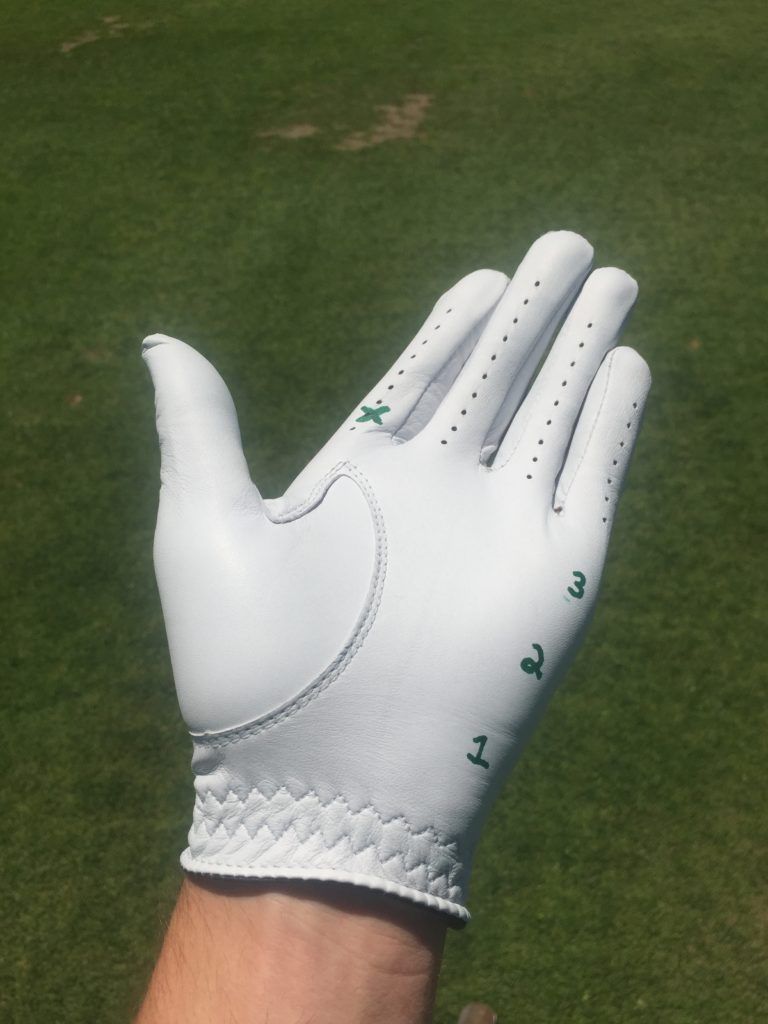
Now, when you take your grip, you can simply place the grip on the hands according to the power position you are looking for:
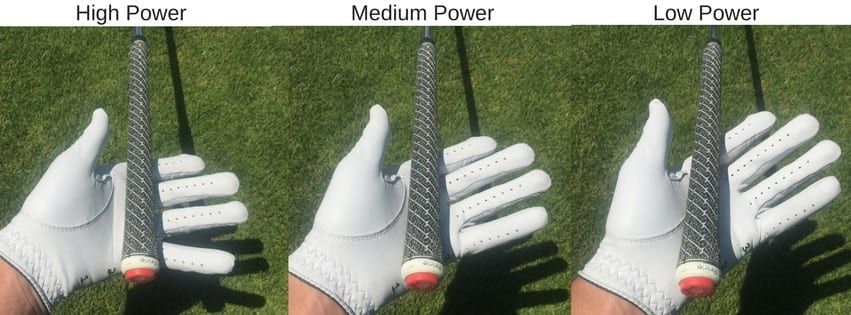
Low Power - This grip position is formed when the grip is held in the cup of the left hand. Since this grip is difficult to use with full swings, most golfers will only use it around the greens for chip shots, or for putting (very common). Despite this, Bryson Dechambeau uses this grip in his full swing, but has jumbo max grips installed on all of his clubs in order to maintain a firm hold on the grip.
Medium Power - This grip position is formed when the grip is held between the "x" and the 2 position of the palm pad. Probably the most common of the three power positions, this grip allows the golfer a firm hold on the golf club, without adding too much power. Many golfers like this grip because it allows for better distance control than the high power grip, but a firmer hold on the club than the low power grip.
High Power - This grip position is formed when the grip is held between the "x" and the 3 position of the palm pad. This is also a popular grip on tour, and is great for those who are not strong enough to generate a lot of club-head speed.
You might be wondering why each of these grips provide the golfer with different amounts of power. This is not necessary to understand, but is thanks to the equation v=d/t. As you put the grip more in the palm, the distance the club head travels through the impact interval is smaller, causing a smaller velocity, which causes less force on the ball at impact.
The Two Thumb Positions
Last but not least, we have the "long thumb" and the "short thumb". This refers to the left thumb, and how far it extends down the shaft. Each position produces a slightly different result, but this time, the two positions are slightly dependent on the power position you choose. The weak power position is associated with the short thumb, while the high power position is associated with the long thumb. This is not a rule, but thanks to the anatomical makeup of the hand, these associations are common.
Long Thumb - The long thumb is formed when the left thumb extends a significant (but not necessarily finite) distance down the shaft. The longer it extends down the shaft, the more the left wrist can radially deviate throughout the swing. Due to this relationship, those players using a long thumb often have longer backswings, and generate more power (although this isn't always the case).
Short Thumb - The short thumb is formed when the left thumb extends only a short distance (once again, we don't generally measure this finitely) down the shaft. The short it extends, the less radial deviation of the left wrist throughout the swing, resulting in shorter swings with less power.
Whether or not you use a long or short thumb grip is not all that important. This should be an adjustment made only when you have mastered the grip. Just realize that if you want to increase your accuracy, it might be smart to take a medium power position grip and short thumb. Likewise, to increase distance, take a high power position grip with a long thumb.
How to Practice the Grip
Knowing all these different grip types is wonderful and all, but it doesn't tell us which hand goes on the club first, the best way to practice the grip, or how a grip should feel.
There are many ways to get into the golf grip of your choice, so please note that my method is not the only method.
Personally, I think that getting the left hand grip right is most important. As we have seen in the two lever model, the left hand grip is essentially what determines how the club moves throughout the swing, while the right hand grip provides support and finesse in most cases.
To get into a proper left hand grip, my best suggestion is to start with some sort of grip trainer. I use this myself for all kinds of practicing. Not only does it provide a grip trainer, but also a way for you to practice your golf swing in small spaces. It may sound elementary, but it is a great way (especially for beginners who have no feel established yet) to ensure a proper gripping of the club. In addition, purchase a glove which will be used primarily for practicing grip, and draw all of the marks that I have shown in pictures above. Finally, use this glove, and alternate between the grip trainer and a normal grip. Be sure that when you are practicing the grip that the club rests on the ground. Do not attempt to practice your grip while sitting in a chair, as the weight of the club being held in the air will alter the grip tremendously.
While practicing the left hand grip, you should feel a good amount of pressure on the pinky, ring, and middle fingers. As you will later learn in this instructional series, this is one of the four pressure points of the golf swing. Also, the thumb will naturally sit slightly right of where the snuffbox is located in relation to the shaft. This is perfectly okay.
Once you have established the left hand grip, and it becomes second nature, practice putting the right hand on. Remember, regardless of the orientation of the left hand, the right hand palm will always be facing perpendicular to the target. When the right hand sits on the grip, you should feel as if you are shooting a little gun, using the index finger as the trigger finger. As stated before, a grip trainer is a great way to feel this.
When the Grip Looks Wrong to You
There will be numerous times when the lighting in the room, the setup that you have taken over the ball, or other various factors will make your grip look and even feel wrong. When this happens, it is important to go back to the alignments that I have spoken about in the above sections rather than adjusting the grip until it feels right. Adjusting your grip based on feel is a wonderful way to screw up your golf game, because like it or not, the grip will feel slightly different every day (especially in early stages of game development).
As mentioned, drawing markings on your golf glove is a useful tool to combat the natural tendency to return to old grip habits.
Grip Size
Unfortunately, it is not sufficient to stop with the basic explanation of how to grip a golf club, because everybody has different sized hands and preferences! Grip size is an important factor in golf, and I have written a guide on how to find your correct grip size for those curious.