Table of Contents

Last updated Nov 09, 2023
Top of the Golf Swing: Where Should Your Club Be?
This post examines the top of the golf swing, and the various positions that a golfer should look for at this point.

Written By: Zach Gollwitzer
Posted in: Golf Swing Fundamentals
Congratulations! You have made it to the top of the backswing. In real life, getting to the top of the backswing takes a matter of seconds, but thanks to the complexity of the golf swing, understanding how to get from point A (address) to point B (top) takes several hours of intense study. Even further, implementing this understanding can take several years.
So far, we have learned how to get the backswing to the 9 o'clock position effectively, which included topics of weight distribution, plane of the club, takeaway methods, digressions on the "flying wedges," and much more. If all has gone well, you should be able to reach a powerful and structurally sound "top" position. Although this will look slightly different per the golfer, there are a few characteristics that are recommended, and fairly standard among golfers. I explain what the top of the backswing should look like, and walk through a few common faults that golfers make between the 9 o'clock position and the top of the backswing.
Which Club are you Using?
Unlike the previous positions (end of takeaway, 9 o'clock), the top of the backswing will look significantly different depending on the club you are using. I can't possibly highlight all these differences, and I believe it would be rather useless to do so. Therefore, just know that as the club gets longer, the backswing becomes longer. In this post, we will be primarily looking at the top of the backswing with the driver, but please note that all the other clubs follow the same rules except for the fact that shorter clubs will never reach the parallel to the ground position at the top. In the photo below, you can see how the driver shaft is parallel to the ground, while the wedge is not:
These differences are not caused by something that the golfer tries to do during the golf swing, but rather the differences in the lengths of the shafts of the different clubs. As the shaft gets longer, the golfer must stand further from the ball, causing the plane angle to become shallower. Because the plane angle is shallower, a 90 degree shoulder turn which is perpendicular to the spine angle will produce a longer swing than a shorter club, which has a steeper plane angle. A golfer should never try to manipulate the length of the swing with each club, but let it happen as a result of proper movements of the body and the length of the clubs.
The Flying Wedge Concept and the Right Elbow
Many times in golf instruction, you will hear someone talking about how a golfer should "tuck the right elbow" to avoid the "flying right elbow." I find this rather deceiving, because there is no explanation of why a golfer should "tuck the elbow," and how to do it properly.
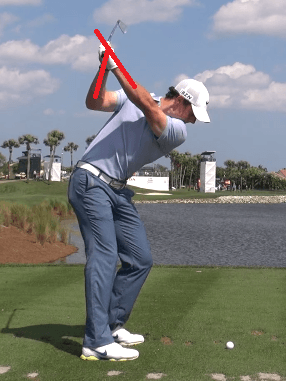
This is where the flying wedge concept comes into play. As discussed in my post about the flying wedges, when the golfer reaches the top of the swing, his/her right forearm should be just shy of 90 degrees to the left forearm and shaft. This is a product of moving the wrists in their respectively proper planes of motion (vertical plane for left wrist; horizontal plane for right wrist). At the top of the backswing, a golfer shouldn't worry about "tucking the right elbow," but making sure that this flying wedge relationship is established:
When golfers hear that they should "tuck the right elbow" to avoid the "flying right elbow," they immediately perform an uncomfortable backswing where they force the right elbow by their side. This is a poor idea because now there is nothing to support the shaft and the left arm!
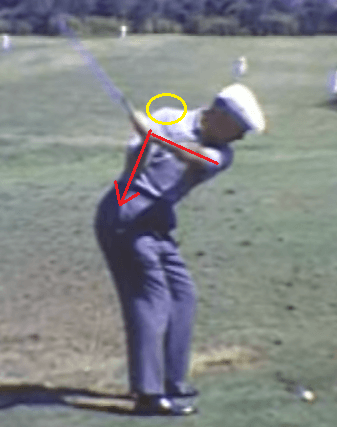
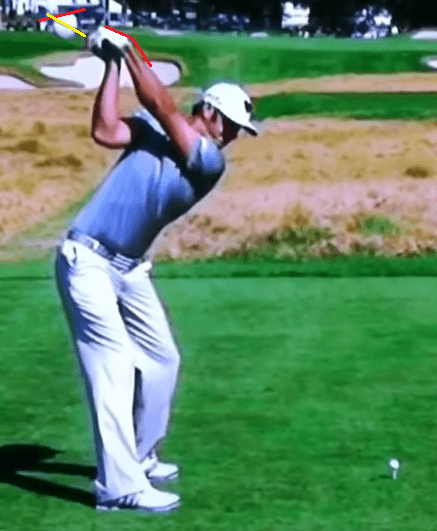
Additionally, I have heard instructors say that the right elbow should point towards the right hip at the top of the backswing, which is only correct in some cases. In reality, the right elbow should be oriented based on where the left forearm is. If the golfer has a steeper swing, where the left forearm is above the right shoulder at the top, their right elbow will need to "fly" in order to support this left arm position. Look at Jim Furyk at the top of his swing:
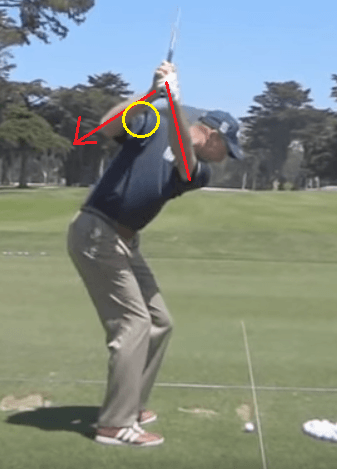
I am digressing slightly, because I would never recommend this backswing position, but it illustrates the point I am trying to make. As you can see, Jim's left arm is well above his right shoulder (yellow circle). If he tried to point his right elbow down at his right hip, there would be no chance of delivering the club powerfully to the ball. Even though Jim has an extremely steep backswing, he has still has properly supported the left arm with the right forearm. As you can see, the angle between his right and left forearms is just shy of 90 degrees.
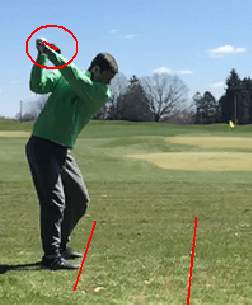
Now if you look at a guy like Ben Hogan, whose left arm was below his right shoulder at the top of the backswing, it makes sense that the right elbow point at the ground. With this shallow of a backswing, the right forearm must point at the ground to establish the (just shy of) 90 degree angle between the forearms:
Just listen to the commentator in this video! He states that the right elbow should point towards the ground, while this is only true in golfers whose left arm is at or below the right shoulder at the top of the backswing:
Summary of the Right Elbow
I have been all over the place with this concept, so let me summarize it all into one statement which you must learn:
The right forearm should be just shy of 90 degrees to the left arm and club at the top of the backswing.
Simple enough? Forget about trying to point that right elbow at a specific point, and redirect your attention to its relation to the left arm.
On Plane at the Top?
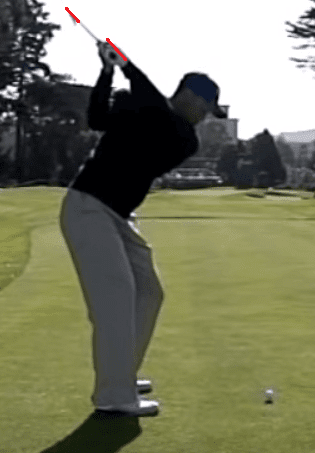
In the section about the takeaway, I discussed that when the club is parallel to the ground, it should also be parallel left of the target line. This is also true for the top of the backswing, because it indicates that the club is on the optimal plane. Like I said, only the longer clubs will reach this "parallel to the ground" position at the top, so don't worry if your wedges aren't pointing parallel left of the target line. You can see this position below:
Unfortunately, it is difficult to illustrate, but the driver in the photo is parallel left of the foot line, which is parallel left of the target line (base of inclined plane). If the driver shaft "disappears" at the top, you are in a good position. If you take the club slightly past parallel at the top of your swing, note that the clubshaft will point slightly right of the target, which is still "on plane."
If you find yourself "across the line" or "layed off" (where the clubshaft points left or right of the target when it is parallel to the ground at the top of the swing), then there is a good chance you haven't properly executed the earlier parts of the backswing. Go back to those sections and work on the takeaway.
Another cause could be a result of your body collapsing at the top of the swing. It is quite possible that a golfer correctly performs the majority of the backswing, but gets lazy at the top and sways, a fault that I have discussed extensively in the earlier parts of the backswing. If you aren't flexible enough make a full 90 degree shoulder turn during the backswing, don't force it. This only leads to off plane motions and swaying.
Shoulder and Hip Turn
In the previous sections, I have only briefly touched on the shoulder and hip turn, mainly because they weren't quantifiable in the early parts of the backswing. At the top of the backswing, we can define them rather clearly.
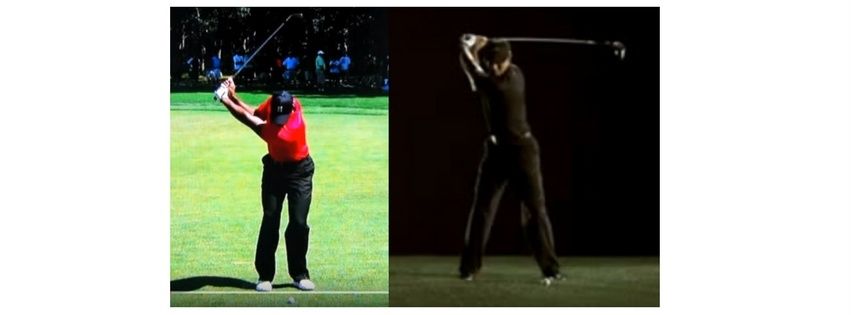
Ideally, the golfer should strive to turn the shoulders 90 degrees (and perpendicular to the spine at address), and the hips 45 degrees (half the shoulder turn). Look how beautifully Tiger has rotated the body in the swing capture below:
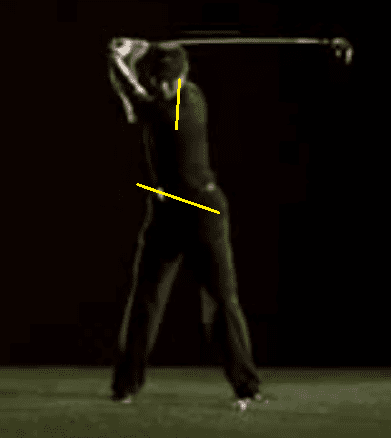
These relationships are not consciously produced during the swing, but are the result of a proper backswing.
Club Face and Left Wrist
Something that you will see many instructors highlight is the club-face at the top of the swing, as well as the left wrist. I have covered this topic briefly in my post about the flying wedges, but would like to clear a bit of fog up regarding the top of the backswing.
The key to understand is how different grips result in different left wrist positions which result in different club-face orientations. Let's start with a neutral grip and square club-face:
Tiger is using a neutral grip in this swing video (although you wouldn't be able to tell from this view; I know this from extensive study of Tiger's swing). With a neutral grip, the left wrist should be flat or marginally cupped at the top. Also, the club-face should be in-line with the plane, or in other words, the face of the club should be flush with the inclined plane (square).
The above example is as neutral as it gets. If the golfer uses a strong grip, the wrist should be cupped at the top, and the club face should still be flush to the plane, as shown in the picture of Tiger.
If the golfer uses a weak grip, the left wrist should be bowed (like Dustin Johnson, but to a lesser degree), while the club-face should still remain flush to the plane.
In conclusion, the club face should be flush to the plane regardless of the type of grip used. The only thing that should change is the orientation of the left wrist at the top (bowed, flat, cupped), which is based on the type of grip used.
If a golfer has the wrong type of wrist position for his/her given grip at the top, the clubface will appear open/shut depending on the situation. When this happens, the golfer must make downswing compensations in order to deliver a square clubface to the ball. Dustin Johnson is a great example of this. He uses a strong grip, but instead of cupping his left wrist at the top like he should in theory, he bows it! This produces a dramatically closed clubface at the top, as shown in the picture below:
On the picture above, I have drawn a yellow line, which represents a square clubface at the top of the swing, which due to Dustin's strong grip, could only be achieved if he had cupped his wrist at the top.
Dustin's swing is obviously unique, and I would not recommend anyone try and replicate it. His swing requires compensations during the downswing, which he has honed through years of practice. Most golfers don't have the time required to make this kind of position at the top work, which is why I recommend they follow the instructions layed out in this section.
Recap:
In order to keep the clubface square and a geometrically flat left wrist (see flying wedges post), the following rules must be followed:
Strong grip = cupped wrist at the top
Neutral grip = flat wrist at the top
Weak grip = bowed wrist at the top
Weight Distribution
At the top of the swing, the weight should be mostly over the right foot, but the golfer may not feel or appear this way. Weight distribution is quite deceiving from a first person perspective, so what a golfer thinks is a proper weight shift may not actually be a proper weight shift.
Instead of focusing on weight shift, I think a golfer should focus on keeping the head centered throughout the backswing, and focus on turning against the right leg "post." This will automatically produce the proper weight shift. When a golfer attempts to shift the weight, it often just results in some sort of sway.
Recap
During this post, I did not explore what a golfer should feel to get the club to the top of the swing, because by the end of the 9 o'clock position, everything happens quite naturally. Instead, I talked through all of the "checkpoints" that can be examined at the top of backswing.
Personally, I find that the top of the backswing is simply a way to check that I have properly executed the takeaway and mid-backswing. If something is off at the top, I know that one of two things has gone wrong:
- My setup/posture/alignment is off (always check this first)
- I am not executing the takeaway/mid backswing properly
Getting to the top of the backswing correctly is half the battle in golf. If you can arrive at the top with the club on plane, head centered, and shoulders turned, the remainder of the swing shouldn't be all that difficult.
In the next chapter, we will be discussing the most important part of the golf swing...