Table of Contents

Last updated Nov 09, 2023
The "Flying Wedges" and Wrist Movement Glossary
The flying wedges are a Golfing Machine concept that will help you make more solid contact every time.

The concepts below are from The Golfing Machine, one of the most influential instructional books of our time. These concepts may seem dry and inapplicable at first, but after you integrate this knowledge with the rest of the instructional series, the golf swing suddenly becomes much easier.
I will start off by defining (with pictures) the two types of wrist movement, and how the forearms move:
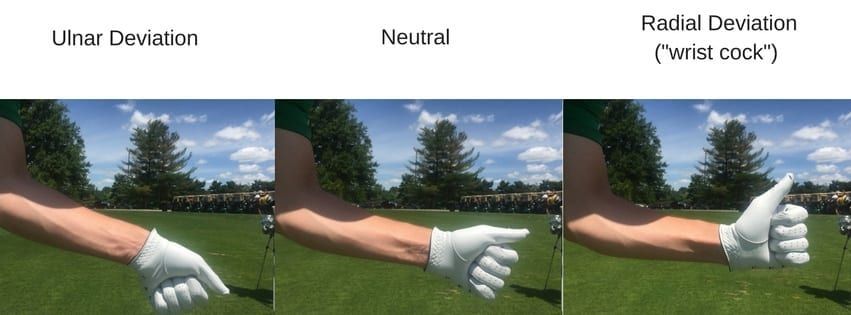
Ulnar and Radial Deviation ("Wrist Cock")
Dorsiflexion and Palmar Flexion ("Wrist Bend")

Pronation and Supination ("rolling/releasing the forearms")
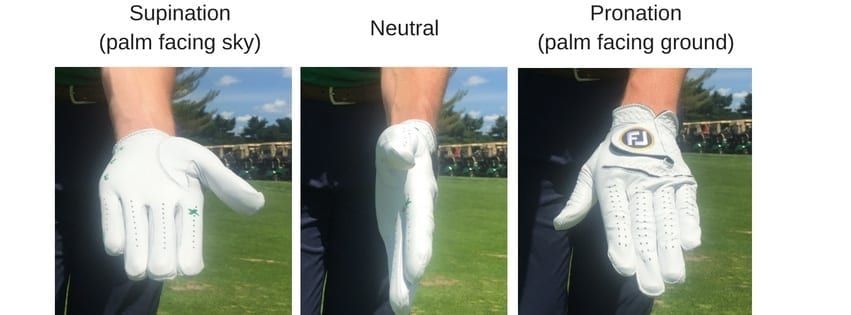
Pronation and supination are slightly confusing because they are different based on the particular forearm you are talking about. For example, in the backswing, the left forearm is pronating while the right forearm is supinating. Throughout the instructional series, if I do not specify, I am referring to the motion of the left forearm, as this is the arm which controls the golf swing.
The "Flying Wedges"
In The Golfing Machine, Homer Kelley introduces a concept called the "flying wedges," which explains how the wrists and forearms must move during the golf swing. I speak in more depth about this in my instructional series, but for now, I will be sticking with the basics.
Essentially, the flying wedge concept explains the planes of motion which each wrist can move in during the swing. If either wrist falls out of its "intended" plane of motion, power and accuracy will suffer.
Homer called them the "flying wedges" because the forearms and wrists form a wedge (simply an angle), and they fly through space while maintaining their wedge shape. Below is one of the lessons from my Break 90 in 90 Days Training Course that further elaborates on these concepts.
The Right Wrist
The right wrist and arm act as a "support" for the left arm and club, and should only move in a horizontal plane of motion. In other words, the right wrist should never experience ulnar/radial deviation, and should only experience varying amounts of dorsiflexion.
There is a clear reason why this is the case but requires an understanding of the two-lever model of the golf swing. When the right wrist experiences palmar flexion, this automatically creates the opposite (dorsiflexion) in the left wrist (as described in B.J.'s video), which we know from the two-lever model post that this is a major fault in the golf swing. In the golf swing, the right wrist should maintain a fairly constant amount of dorsiflexion throughout. It may seem impossible to do this, but by properly supinating/pronating (releasing) the forearms through the impact zone, this dorsiflexion ("right arm flying wedge") can remain intact.
This is the most important component of the right wrist movement, but we must also discuss the ulnar and radial deviation of the right wrist, and why this is not recommended in the golf swing.
The reason we want to eliminate any ulnar/radial deviation of the right wrist is to keep the right forearm "on plane" throughout the swing. This provides maximum force through impact, and allows for maximum directional control, as all the forces are moving in one plane of motion rather than two. When the right wrist deviates in either direction, the club shaft and the right forearm will no longer remain aligned through impact. Additionally, this is a source of "over swinging" at the top of the swing, which throws off rhythm and timing.
The Left Wrist
The left wrist is the opposite of the right, and it can only move in a vertical plane of motion. In other words, the only thing that the left wrist should be doing during the swing is ulnar/radially deviating. Like the right wrist, this is made possible by the pronation/supination of the forearms through impact.
When the left wrist experiences dorsiflexion, the two lever model of the golf swing is destroyed, and extreme amounts of acceleration and force are lost; especially if this happens through impact.
The Geometrically Flat Left Wrist
Now there are a few caveats when talking about the left wrist in the golf swing. The first occurs when the golfer uses either a strong or weak golf grip. To understand this, let's look at the left wrist when the club is gripped neutrally and at impact (remember at address the left wrist will be slightly cupped, and the flying wedges have not been established yet):
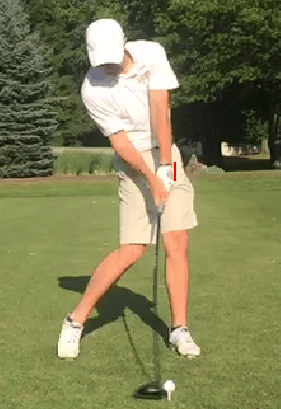
From the face on view, it appears that the left wrist is slightly dorsiflexed (notice how there is a small space between the vertical red line and the back of my left wrist), but this is not the case. This is what a "geometrically flat" left wrist looks like, and naturally occurs when you let your left arm hang freely under the shoulder. To maintain the left arm flying wedge, the left wrist should never palmar/dorsiflex in relation to this "geometrically flat" orientation.
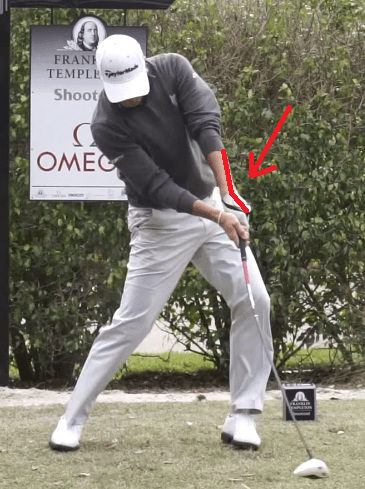
Now, when the golfer uses a grip that is not neutral, everything starts to become visually deceiving. This is not to say that using a strong/weak grip is a bad thing, but merely an added confusion to the relationships in the golf swing. When the golfer uses a strong/weak grip, the "geometrically flat" left wrist is changed in appearance. Look at the photo below of Ryan Palmer, who uses a strong grip. Notice how the left wrist at impact looks like it is slightly cupped (red lines), but in reality, this is geometrically flat because of his strong grip:
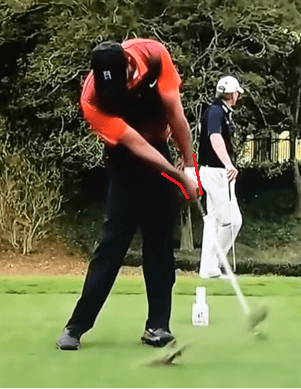
Now look at Tiger Woods at impact, who uses a neutral grip:
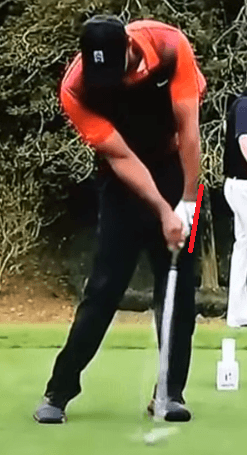
Tiger slightly "bows" his left wrist at impact, which is perfectly okay, because it is "insurance" against the fatal flaw of cupping the left wrist.
The grip orientation (strong, weak, neutral) is critically important to acknowledge because depending on the grip you use, the flying wedges will appear different, but remain functionally similar.
The other caveat to be discussed with the left wrist is the "margin of safety." I use this term because although the left wrist should never dorsiflex, it can palmar flex slightly in some cases. It is always better to error on the side of palmar flexion, because as the club strikes the turf, a force is applied against the club, which can cause the left wrist to palmar flex slightly. You can see this happening in the video of Jordan Spieth below. Notice how his left wrist bows (palmar flex) as the ground creates resistance against the shaft:
How to Maintain the "Flying Wedges" Throughout the Swing
At this point, these concepts are probably a bit blurry, mainly because the golf swing is far too fast to monitor the wrists throughout. To clear the fog, I am going to walk through each part of the swing, and explain what the flying wedges should look like at each point. Again, please note that this is only an abbreviated explanation of the golf swing, and is expanded upon greatly in the remainder of the instructional series.
The Setup
During the setup, you can notice that the flying wedges are not intact. This is okay, as long as they become intact immediately during the backswing.
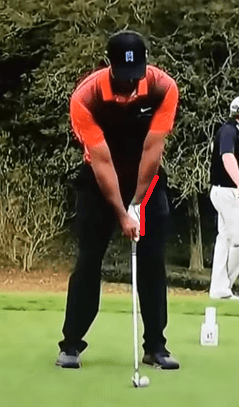
Notice above how the left wrist is dorsiflexed, which is a major flaw during the swing. This is okay at address because the hands are sitting far behind the actual impact position. A golfer could setup in the impact position, but will most likely find this uncomfortable.
Takeaway
During the takeaway, the wrists quickly establish proper relationships, and are gradually supinating to maintain these flying wedge relationships. A picture representation of this is rather difficult, but below I have shown three positions with accompanying explanations that will hopefully get the job done.

By the time the golfer gets in the position shown above, he/she should have the flying wedges established. It is difficult to tell, but at this point, Tiger's left wrist has lost most of its dorsiflexion which was shown at address position. Additionally, you can see that the forearms have begun to supinate.
At the end of the takeaway, Tiger has fully established his flying wedges. The left wrist should be geometrically flat, the forearms supinated 90 degrees, and the right wrist dorsiflexed for support. Notice that the left wrist has not radially deviated yet. This is simply a result of his "one-piece takeaway," and the flying wedges are perfectly intact still. The only thing that matters here is the geometrically flat left wrist, forearm rotation, and dorsiflexed right wrist.
Top of Backswing
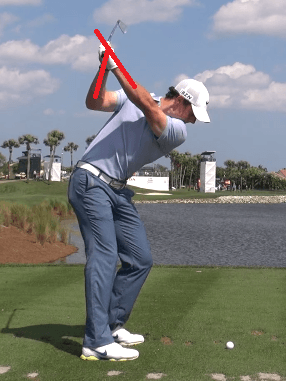
At the top of the backswing, the flying wedges are still intact, and you can see that the right arm flying wedge is nearly perpendicular, acting as a truss support for the left arm flying wedge. Note that depending on the grip, the left wrist will appear differently. With a strong grip, the left wrist will be cupped at the top. With a weak grip, the left wrist will appear perfectly flat or slightly bowed. With a neutral grip, the left wrist will appear slightly cupped/flat (due to the natural tendency for the wrist to dorsiflex when hanging freely).
Below is a picture of Rory Mcilroy at the top of his swing from the DTL view. Notice how his right arm is (just shy of) 90 degrees to his left arm. No matter what kind of backswing you have, this relationship must exist.
Also, you can't see the wrists clearly, but at this point in the swing, Rory's left wrist is geometrically flat with maximum radial deviation, and his right wrist is dorsiflexed with zero deviation.
Impact and Release
During impact and just past impact, maintaining the geometrically flat left wrist and dorsiflexed right wrist is essential. Take another look at Tiger Woods at impact, and notice how he has maintained these relationships:
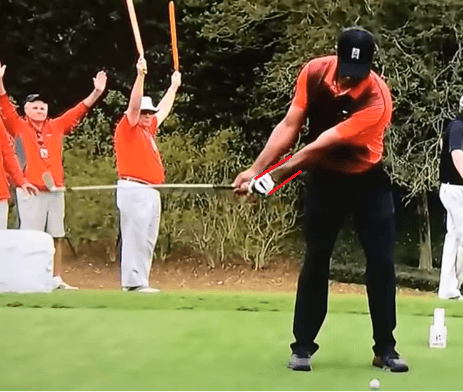
Even more importantly, he maintains these relationships after impact:
Many amateurs are told to "release" the club, and in their attempt to do so, they cup the left wrist and "flip" at the ball, which destroys the flying wedge relationships. The proper way to release the club is by supinating (pronating) the left (right) forearms, and straightening the right arm, which allows the geometrically flat left wrist to be maintained. For many golfers, this motion requires a lot of practice. Fortunately, you can practice this just about anywhere. My favorite way of practicing this is with a short weighted club. While watching T.V., movie, etc., I will hold the club in my left hand only and swing it back and forth practicing the release as shown in the video below. This video is from my premium training course, Break 90 in 90 Days.
Finish
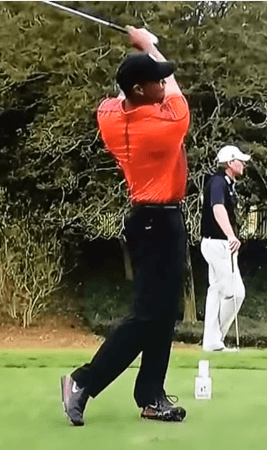
Around this point of the golf swing, the left wrist must dorsiflex (flying wedges destroyed) in order to fold up into the classic coiled finish position.
Recap
- There are two positions in the golf swing which the flying wedge relationships do not apply - Address and Finish. The rest of the swing requires that the left wrist remains geometrically flat, and the right wrist dorsiflexed.
- The left wrist must never dorsiflex, but in some cases, can palmar flex as a "safety net"
- The pronation/supination of the forearms allow the golfer to maintain the flying wedges.
About the author: Zach Gollwitzer

Hey, I‘m Zach, the founder of The DIY Golfer! I created this site while playing D1 collegiate golf with a simple mission—I wanted to learn the golf swing and get better at golf myself.
Fast forward a few years, and my “journal“, The DIY Golfer, has been viewed by millions of golfers worldwide looking to do the same with their games. my mission is to make golfers more consistent in just a few hours a week through advanced practice strategies and timeless, first-principle golf instruction.