
To most, the word "physics" is an ambiguous term at best. Everyone knows what it is, but at the same time, not many people could define what "momentum" or "normal force" really means. Over the years, golf has come into light as an extravagant activity accompanied by expensive clothing, formal dinners, great tradition, and undying prestige. But when all the formalities and distracting superficial elements are removed, golf revolves around one thing, and that is the golf swing. Drive, chip, or putt, each golfer is making a swing, which is the basis for all tradition associated with the game in the first place.
With all its moving parts, golf may appear overly complex by nature, but at its core, everything in the game revolves around the physics of motion, which is definable thanks to the work of our friends Sir Isaac Newton, Albert Einstein, Niels Bohr, Marie Curie, and several other notable physicists.
The problem that most golfers face is not a lack of coordination, but a lack of understanding of the golf swing. Many forms of golf instruction point towards the physical laws of the golf swing, but never dissect it well enough for the average student to gain fully clarity of the issue at hand.
Why are you chunking your pitch shots? The common answer may be to "stop throwing your hands at the ball, get your weight forward, and accelerate through impact." I've always had a frustration with these explanations, because they dodge the real question at hand:
"What is the bio-mechanical movement my body must make to properly contact a pitch shot time and time again?"
That is what we are really going for, and to understand how to go about doing this, we need to explicitly define what throwing the hands, getting the weight forward, and accelerating through impact really means.
In order to do this, it would be wise to construct a workable scientific model in which we can base our understanding of the golf swing on. In this post, I will be referring to a model popularized in 1968 through the work of Alastair Cochran and John Stobbs while performing an extensive study on the physics of the golf swing alongside the Golf Society of Great Britain. Although no such correlation has been formally recognized, I believe that this study may have been influential in Homer Kelley's 1969 masterpiece; The Golfing Machine. Both of these men contributed an enormous amount work towards our current understanding of the golf swing, much of which has been thrown aside to make room for famous and infamous "swing theories" constructed by modern swing coaches and high speed cameras.
I do not wish to turn this post into a debate over who is right about the golf swing, so let us begin.
The Basic Model
Our journey to understand the practicality of physics in the golf swing starts with two levers attached to a fixed point. Consider the image below:
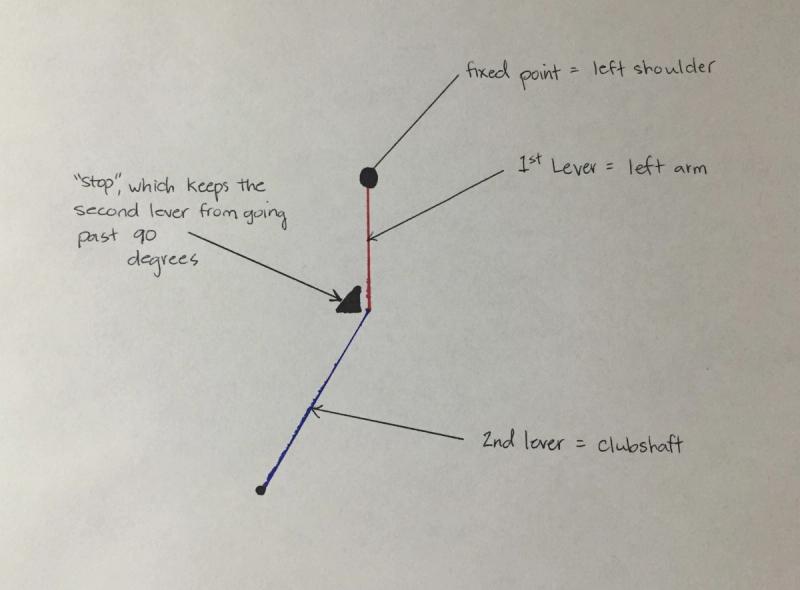
Looking at this image doesn't make a whole lot of sense at first glance, but maybe it's not so unfamiliar after all:
This robot is good!
Note: A critical constraint of this model is the straightness of the left arm. Without keeping the left arm straight, the first lever breaks down into two separate levers.
The model makes sense, but who really cares? A human has so much more going on during the golf swing anyways?
The answer is a simple one. We use the model in order to direct our efforts to the most efficient golf swing we can possibly make. By drawing just a few simple conclusions from the model, we can then transfer these to our own swings and produce more consistent results.
But what are these conclusions?
How Angular Motion Operates
The primary step in deriving useful conclusions that can be applied to our own games is to first understand the physics of the model.
In the two lever model, there is no use in a backswing because the "robot" is a rigid structure that can exert a great amount of force without moving the fixed point that the two levers originate at. Therefore, all we have to understand is how the model works from the top of the swing through the impact zone.
If you have read the previous post about the inclined plane, you are familiar with the "arc" of the swing, or in other words, the circular motion that the club-head travels in to reach the "low-point" of the swing. You are also familiar with the concept of a "plane" of motion, which is a distinct characteristic of angular motion thanks to the centrifugal force pulling outward on the club-head throughout the range of motion. To better understand our model, we must take a closer look at this motion, and find out what forces are involved.
As you may have noticed, the right arm has nothing to do with this model, and for good reason. That is because the right arm only plays a small role in this type of golf swing (yes, there are swings powered by the right arm, but we will not be talking about these here). So for now, just forget that the right arm exists. Believe it or not, by using just the left arm, it is possible to hit a golf ball upwards of 280 yards as demonstrated by the great one-armed golfer Bobby Reid back in the late 60s with a Persimmon Wood! I have demonstrated this one-armed swing in the video below:
In the above video, you can notice how my left arm bends at the top. This is due to a lack of strength in my left arm, and is not supposed to happen according to the model. As you will begin to see, the right arm plays a large "supporting" role in the golf swing which will allow this left arm to remain straight.
Now, let's explore what is happening throughout the golf swing according to this model. We begin at the top. As seen in the model, there is a "stopper" that prevents the second lever (club-shaft) from collapsing at the top of the swing. This is simply the limitations of the left wrist radial deviation. This concept is further explained in my post about the flying wedges, and I highly recommend that you read it before proceeding.
At the top of the back-swing in this two lever model, we have a full radial deviation of the left wrist (limited by the range of motion of the left wrist), and a pronation of the left arm. Do not worry if this is confusing, as I will expand greatly upon this model throughout the rest of the instructional series. During this post, I just want to give a brief overview of the model so that the rest of the instruction makes more sense.
From the top, we must now create the speed required to strike a golf ball. In our one-armed, two-lever model, this is powered entirely by the fixed point in which the two levers rotate about. In reality, no golfer could create enough power by doing this, but once again, we are keeping things as simple as possible in order to understand the basic forces that dictate the success or failure of a golf shot. So for now, assume that your left shoulder has superhuman strength (like the golf robot), and can propel your left arm at high speeds into the downswing.
So under these assumptions, we can now begin to understand how speed is created in the downswing through the model.
After your superhuman shoulder propels the first lever into motion, we start to see the magic of angular motion in action. Since the first lever (left arm) is moving around a fixed pivot, the motion travels in an arc. Initially, the second lever "lags" behind the circular moving upper lever, and travels at the same speed as the upper lever. During this first part of the downswing, the upper lever is providing nearly 100% of the momentum to the swing. As we get further into the downswing, the outward pull of centrifugal force causes the second lever to begin to catch up with the first. Momentum is being transferred through the law of conservation of angular momentum. The left arm (lever 1) is slowing down, and the club (lever 2) is speeding up.
Finally, the left arm (lever 1) approaches the "low-point" of the arc (vertical condition), and almost completely halts as the momentum is transferred rapidly to the second lever in a "whip-like" action until the second lever reaches a straight line condition with the second lever at the low-point.
Practical Applications of the Model
Obviously, this is an overly simplified look at the motion of the golf swing. There is no possible way to reproduce this exact motion by using a human body. There are several factors that are not accounted for by this model, including things such as:
- The resistance of the ground at impact
- The generation of power from the top of the backswing
- The motion that humans must make to get to the top of the backswing
- What happens after impact (there is far too much momentum for a golfer to simply stop)
- The fact that golfers generally impact the ball before the low point (except with the driver)
So to most, building this model seems like a completely useless exercise in and of itself. I would now like to take what we have discussed and draw some useful conclusions that can be implemented in your own golf game.
Takeaway #1 - Importance of a Steady Center and Proper Left Wrist Alignment
Ever heard someone tell you to "keep your head still?"
It is one of the most annoying things to hear, but at the same time, one of the most important things to know.
As you might have realized, there is no golfer on this planet who literally keeps their left shoulder (the fixed point in the model) completely still throughout the swing. Thanks to the anatomical makeup of our bodies, and the need to generate power in the golf swing, we must move this left shoulder in some way during the backswing and the downswing. That being said, there is a way to ensure that your "low-point" does not move during the golf swing.
Before explaining how you can go about doing this, let's define "low-point" one more time, and describe the importance of it.
As mentioned earlier during the inclined plane post, the low point is the bottom of the swing arc. It is (according to the model) the point where both levers form a completely straight line. Assuming the left arm remains completely straight (lever 1), the low-point is located directly below your left shoulder.
So assuming you are swinging perfectly around that fixed point, and the ground is flat, you will never chunk or skull a golf shot if the ball is positioned directly below, or back of (to an extent) the straight line drawn from your left shoulder and the ground, AND the second lever (club-shaft) has not passed the first lever.
Knowing this, wouldn't it be smart to find a way to keep your swing fixed around a stationary center, and eliminate all dorsiflexion of the left wrist through the swing as described in the flying wedge post? If you did these two things on every swing for the rest of your life, assuming that you are placing the ball somewhere between the center of your stance and the low-point of the swing, you would NEVER hit a fat or skulled golf shot again. Check out the image below to clarify this concept:
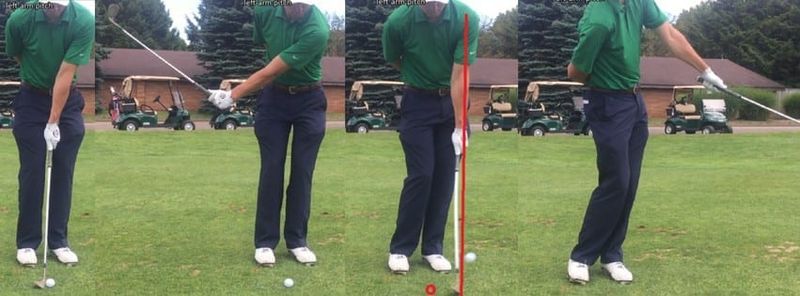
In the third photo above, I have drawn a red circle representing where the ball was positioned, and drawn a red line to illustrate how the low point of the swing occurs under the left shoulder when the two levers are in a straight line. Also, notice how I have kept my left wrist flat in the follow through. Once again, I never said that doing these two things would be easy. Turns out, these two things are the DEATH of most golfers. What we can do though is try our best to achieve these two conditions in the golf swing.
The first step in doing this is by maintaing our fixed center throughout the golf swing. This ensures that the low point remains the same from the time we address the ball to the time we impact the ball. When I say "fixed center," I am talking about a point somewhere in the middle of your chest just below your head (it is not necessary to pinpoint an exact location). The logic follows that if you keep this "center point" in the same location throughout the backswing and impact (it will eventually move in the follow through), the left shoulder (which determines low-point) will remain stationary as well.
The reason that so many instructors will tell the student to "keep their head still" is because by focusing on keeping your head still, you are keeping your "center-point" still as well. It is only when the golfer tries to keep their head down throughout the entire swing that they get into trouble.
It is rather simple keeping the center point still on the backswing, because you can just focus on keeping the head stationary. But the downswing becomes more complicated, because of this thing called "axis tilt." You may notice that very few golfers actually keep their head completely still throughout the entirety of the swing. That said, there are golfers who keep the center point still. The head has the tendency to move back and down during the downswing, but while this is happening, the "center-point" (middle of upper chest) still remains in the same place, keeping the low-point in a fixed location. We will explore the concept of axis tilt in the downswing chapter of the instructional series.
The biggest problem that a golfer faces is the fact that one cannot consciously control the location of the center point during the downswing. The best option is to focus on keeping the head steady in the backswing, and then executing a proper lateral hip slide during the downswing in order to offset the down and backward movement of the head with the rightward axis tilt, thus keeping the center point fixed and low-point fixed in the process. Once again, this will be covered in depth later in this series.
In the end, keeping the center point fixed will come as a result of two factors:
- Consciously keeping the head still (which in turn keeps the center point and low point fixed) during the backswing
- Learning the correct downswing sequence, and PRACTICING
Now that we have discussed the concept of a "fixed center," we need to figure out how to prevent the golf club (lever 2) from passing the left arm (lever 1) at any point during the downswing.
The best way to do this is by learning to maintain what Homer Kelley dubbed as the "geometrically flat left wrist." See the image below:
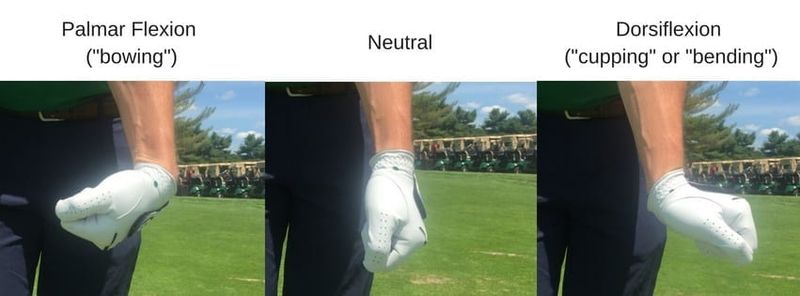
The best way to learn this is through practicing the basic pitching motion, focusing on maintaining a straight left arm, and a left wrist that moves only in the vertical plane of motion as described earlier in this post. The club will be opened in the backswing, squared at impact, and closed during the follow through by simply pronating and supinating the left arm (first lever).
I go into great detail about properly executing this motion in the remainder of the instructional series.
Takeaway #2 - The definition of acceleration
Every golfer understands that deceleration is the ultimate sin.
Few golfers understand the root cause of deceleration.
In short, deceleration happens when the second lever passes the first lever as a result of centrifugal force pulling outward on the club. In other words, this is another way of highlighting the importance of keeping the left wrist flat during the downswing and through the impact interval.
Sure, you can slow down the speed of the hands, which would technically be a "deceleration," but assuming the center point of the swing remains fixed, and the left wrist is flat, you will still make perfect contact with the golf ball.
In other words, consciously trying to accelerate the hands through the ball is a mistake, and only leads to bad sequencing/rhythm. What you should focus on is maintaining a constant velocity of the left arm (lever 1), and maintaining that flat left wrist, which will automatically prevent deceleration of the club head. You can thank the physics of angular motion for that one.
Takeaway #3 - How Ball Position Affects Flight
This is a bit of a crossover between the two lever model and my post about ball flight, but I wanted to include it anyways. If you haven't read the post about ball flight, I suggest you do so now in order to understand this to a greater extent.
Since we now know that the low-point sits directly under our left shoulder, it frees us to experiment with different ball positions. Rather than worrying about finding the "perfect" or "correct" ball position for each club as many instructors will teach, we can change our ball position based on the different shots we want to hit.
There is only one golden rule here, and that is to keep the ball at or behind the location of the left shoulder with the exclusion of the driver (because it is sitting on a tee and can be hit up on slightly).
By moving the ball behind the location of the left shoulder, we are essentially hitting the ball from a steeper angle of attack with a leaning shaft angle, which imparts a greater spin and lower trajectory.
I have written extensively about ball position, so you can skip forward and read my post about ball position now, or continue in the recommended order.
Conclusion
With this simple model, there are numerous ways we can apply it to our golf games. I covered the major takeaways, but we didn't even discuss how altering the length of the second lever (club shaft length) and the weight of the second lever (club head weight) influence club head speed. We also didn't even talk about how the right arm influences the golf swing!
There are obviously many ways to elaborate on this simple model, but hopefully by reading this post, you have a tree trunk of knowledge that you can build on moving forward.
To wrap things up, let's remember a few things:
- Keep your head still in the backswing to ensure a fixed low point
- Keep your left arm straight at all points of the backswing and downswing through impact (it will eventually bend in the follow through)
- Keep your left wrist geometrically flat at all points of the backswing and downswing through impact (this will also eventually bend in the late follow through).