
Welcome to the impact interval. What happens here separates the professional golfers from the amateurs; the amateurs from the duffers. This is the moment of truth.
Up until this point, I have described optimal methods for executing the backswing, the transition, and the mid-downswing.
Unfortunately, according to the laws of physics and geometry, none of this matters.
Although the backswing and early downswing can dramatically increase the chances of a successful strike of the golf ball, they do not guarantee it. Likewise, poor fundamentals in the backswing and early downswing will decrease the chances of a successful strike, but as we have seen with many golfers over the years, it does not guarantee a poor strike. I've already posted the following video in a separate portion of the instructional series, but it is just a reminder to us "mechanical" and "perfectionist" golfers that impact is the only true measure of a good golfer:
Sure, these guys may not swing "on-plane," but at impact, their lead wrists are geometrically flat, and their club-path to club-face relationships are in conjunction with where they want the ball to go. Additionally, they are able to repeat these motions.
As a "mechanical golfer" myself, I can't help but cringe at these golf swings. I've been beaten by a fair share of golfers with these "non-textbook" swings, and even though I understand why they can beat me, it still doesn't sit well in my mind. That being said, I will continue this post attempting to decipher the "optimal" way of executing the golf swing during the impact interval. This instructional series was never meant to explain why Bubba Watson or Tommy Gainey can play professional golf, but rather to explain what I believe are the best methods of swinging a golf club.
The First Half of the Impact Interval
The first half of the impact interval is the motion between P6 and P7 (impact). According to Homer Kelley, this is the stage 5 of the power package, which he calls the "power package release." Everything that happens here is automatic and as a result of centrifugal force. If the golfer has reached the proper P6 position mentioned in the last post, all he/she must do is continue a rhythmic lower/upper body movement that allows the club to release into the ball. This is where all of the power accumulators rapidly return to their "in-line" orientations, which releases a great amount of kinetic energy to the ball. Since I have already explained the release sequence of the power accumulators, the following sections of the post will be dedicated to diving a bit deeper with them (especially PA3 due to its confusing nature).
PA4 and PA2
PA4 begins its release earlier than P6, but it is the master power accumulator in the golf swing which can help us to further understand centrifugal force in conjunction with PA2 during the first half of the impact interval. PA4 releases as the result of a proper movement of the lower body, while PA2 releases as a result of centrifugal force. My aim in this section is to describe this centrifugal force release of PA2 to the best of my ability.
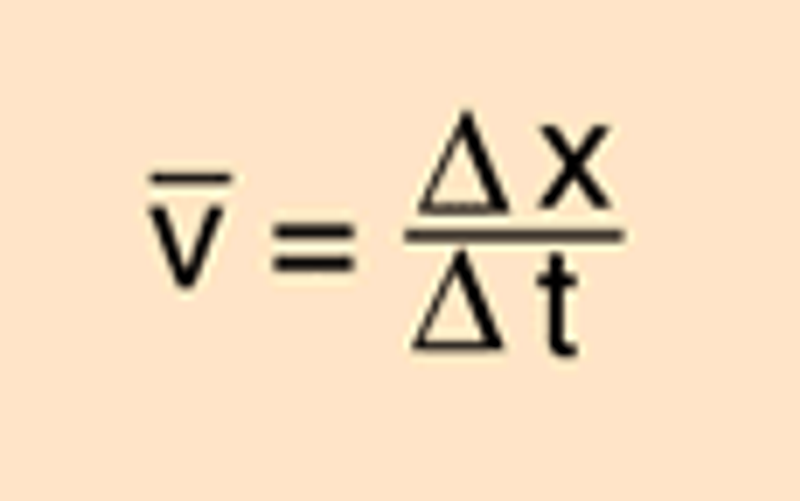
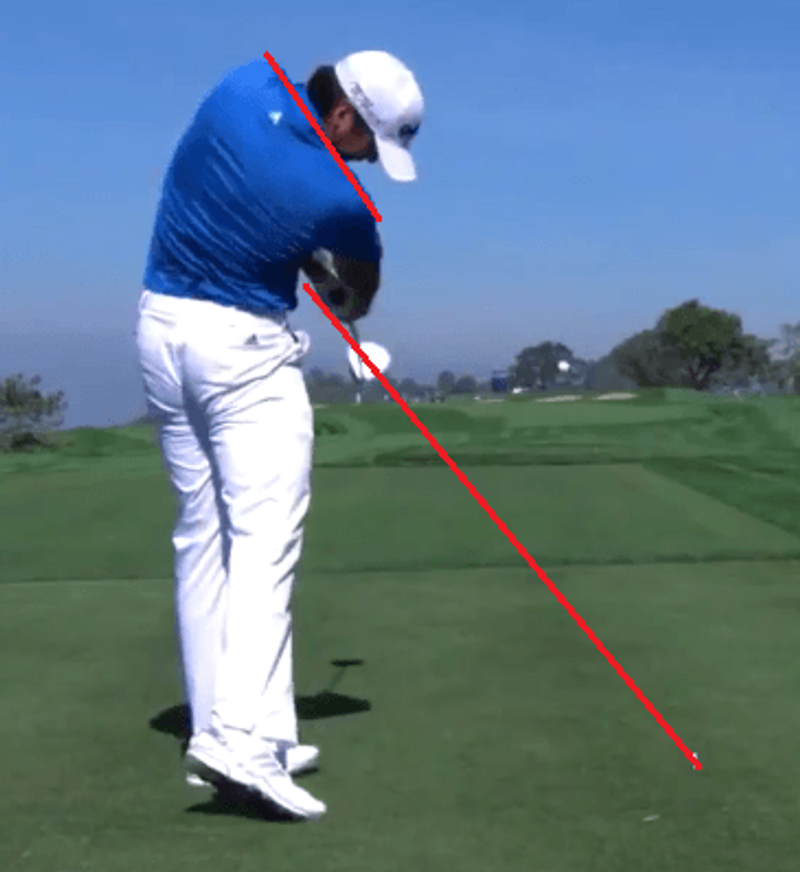
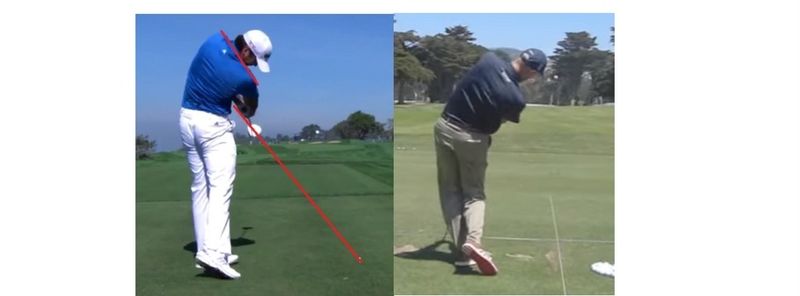
Homer Kelley describes the release of these two power accumulators as an "endless belt," which describes how the golf swing acts as a natural pulley belt, whereby the hands and arms move at the same velocity during the entire downswing, but because of the lag created in the downswing, the club head has to travel a much greater distance than the hands do to reach the impact position. This naturally increases their velocity in comparison to the hands and arms. In the photo below, notice how far (illustrated by red lines) the hands have to travel vs. the club-head to reach the estimated impact positions:
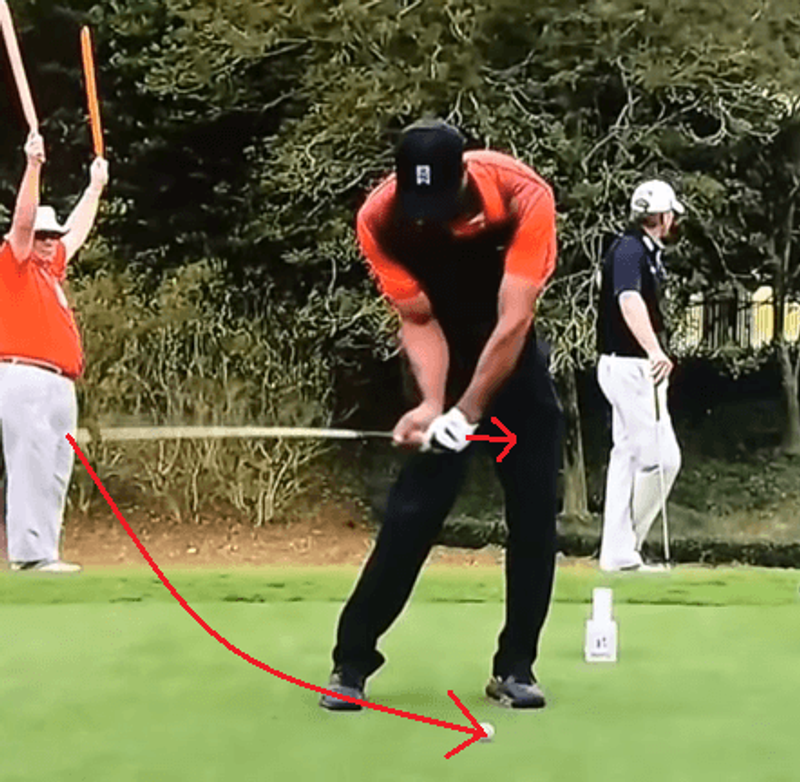
According to our velocity equation below, the clubhead must move faster than the hands in proportion to the distance traveled from P6 to P7 (impact).
In the video below, Jeffrey Mann explains how the club-head releases as a result of the angular motion of the hands, and claims that centrifugal force is not a real force. Those fond of physics will realize that Jeffrey Mann is correct in this explanation. I simply use centrifugal force to explain the golf swing for simplicity sake because I think getting into too much detail about physics would simply confuse a golfer who is solely trying to learn the golf swing.
These illustrations will help a golfer visualize what is happening when PA4 and PA2 release through impact.
PA2 and PA3
PA4 releases because of a proper pivot (lower body action), while PA2 releases because of centrifugal force on the club-head. At this point, it may be a bit confusing conceptualizing how centrifugal force can release the club-head into the ball since the club-face is open relative to the ball at P6?
This is where the third power accumulator comes into play. A split second after PA2 begins to release as a result of centrifugal force on the club-head, PA3 begins to release so that the club-head is delivered square at impact.
To demonstrate the power and purpose of PA3, I have posted a short video below, which is me using the 3 different power positions of the grip (see the grip fundamentals post if you have forgotten what these are). Notice how my hand is more or less still, while my forearm is pronating and supinating through the impact interval. Also, notice how the distance which the club travels is less for the medium and low power position grips than the high power position grip:
In the video, the first grip I use is the high power grip, and you can see the large distance that the club travels by solely pronating and supinating my forearm.
The second grip I use is the medium power grip.
The third grip I use is the low power grip, and you can see how the club barely moves at all with the pronation/supination of my forearm. The low power grip "zeros out" the third power accumulator. This low power grip places the club in the lifeline of the left hand, which is generally used only for putting and bump and run chip shots, since it is difficult to hold on to the club for longer shots. Bryson Dechambeau is a rare example of a golfer who uses a low power grip for all of his shots, and needs jumbo max grips in order to do so as described in the video below:
The grip he is describing is the low power grip, and in effect, Bryson eliminates his third power accumulator by using this grip. This does not mean that Bryson fails to pronate and supinate his forearms through impact; it solely means that when he does pronate/supinate the club through impact (in order to achieve a square clubface at impact), he gets negligible power from this particular accumulator, and is relying on only PA4 and PA2 for his power. This works well for him thanks to his size and strength, but wouldn't be preferable for the average golfer.
Fortunately for my instructional purposes, 99.99% of golfers use either a medium power or high power grip position, and utilize the third power accumulator, which is why I have gone a great length attempting to explain how PA3 works.
All of this talk about "zeroing out" the third power accumulator is a digression from the main point I am trying to make in this section. What a golfer really needs to understand is the importance of sequencing the release of PA2 and PA3 in order to return the club face square (or slightly open/closed depending on the shot) at impact.
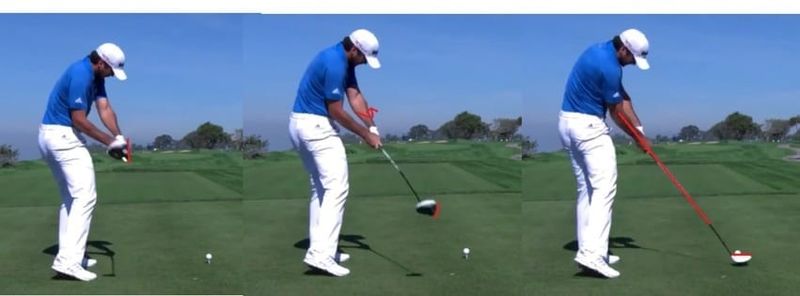
Notice in the sequence above how Jason Day is supinating his left forearm through the first half of the impact interval (releasing PA3), which subsequently allows the clubface to return to the ball in a square position. Also notice how his right forearm at impact is on the same plane as the clubshaft. By having this relationship at impact, Jason is directing all of his power in the same direction.
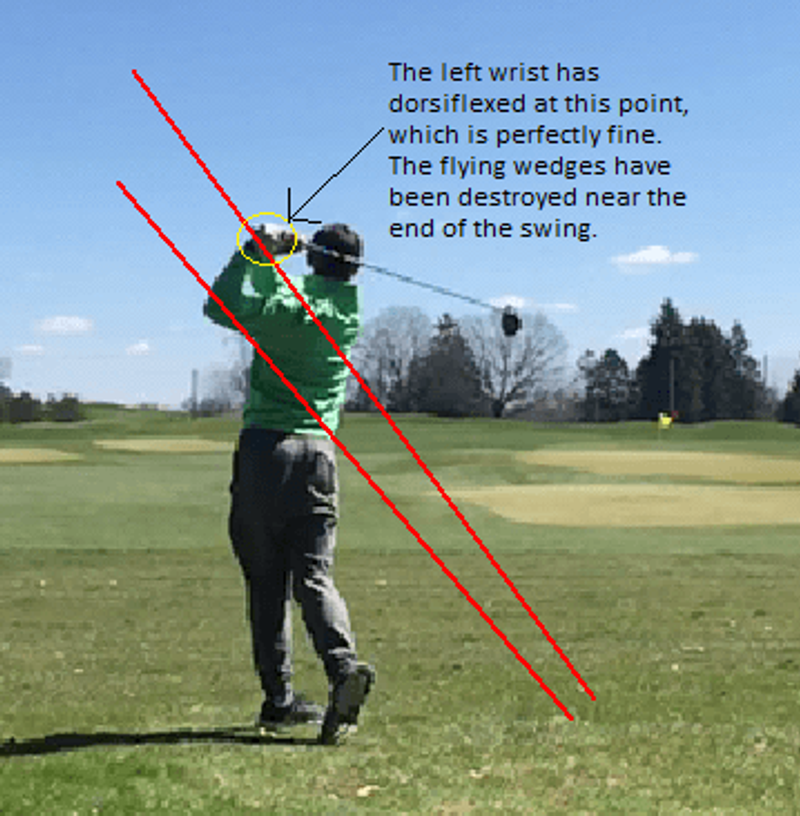
The right forearm isn't required to be on the same plane of the shaft at impact so as long as the flying wedges are intact. In the impact position, "intact flying wedges" simply mean that the left wrist is geometrically flat (remember, it may not appear perfectly flat at impact depending on which type of grip you use - strong, neutral, weak), and the right wrist is dorsiflexed slightly (amount of dorsiflexion depends on the bend of the right elbow at impact, which once again is variable among different golfers).
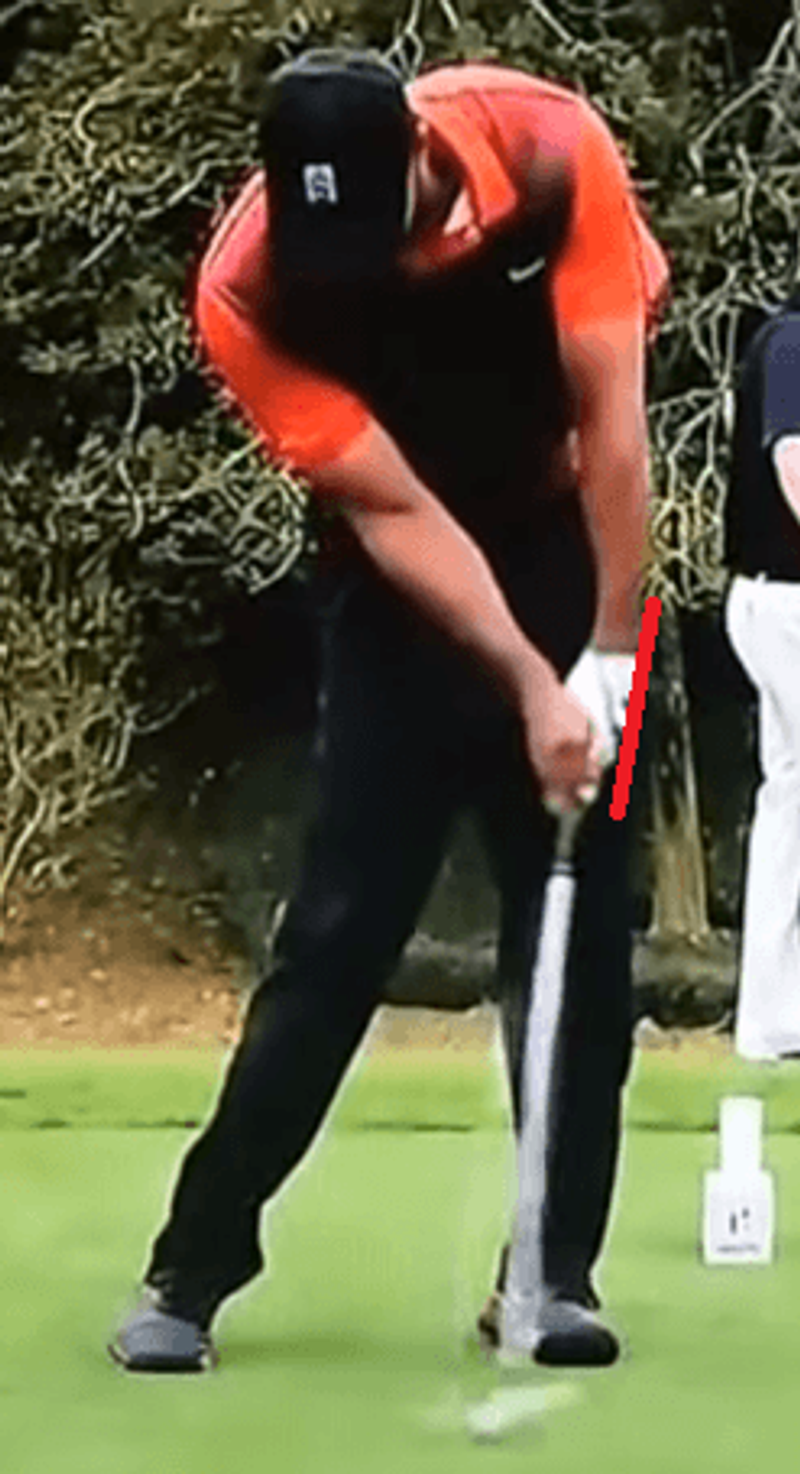
Tiger uses a neutral grip, so the left wrist appears flat at impact. His flying wedges are intact.
Last, at impact, the head should be behind the golf ball (axis tilt), and the majority of the golfer's weight should be on the left side (contained by the left leg "post").
Recap of the First Half of the Impact Interval
During the first half of the impact interval, PA4, PA2, and PA3 have all began to release, which all happens naturally as the result of the lower body pivot (i.e. rotation), which eventually brings the club to the impact position.
All that being said, we must remember that a golfer cannot consciously make any of this happen! This part of the golf swing should happen as a result of properly executing the backswing and transition. When there are problems at impact, this most likely means that you have gone wrong somewhere else in the golf swing, and should never try to fix your impact position by attempting to manipulate it during this short interval of time.
Another cause of faulty impact is what happens after the ball is hit, characterized by the second half of the impact interval and follow through. It is important for a golfer to practice release motions and keep the speed going past impact!
The Second Half of the Impact Interval and Finish
The second half of the impact interval happens from the time the ball is struck (P7) until the club shaft is parallel to the ground (P8), and is commonly referred to as the "release," and is easiest to explain in regards to the entire follow-through motion (P8-P10), so in this section I will be completing my explanation of the entire golf swing.
Every time I read a golf magazine, it seems like I always come across some "new" release that will solve your golf game.
- "Flip your hands at impact to increase power"
- "Extend your arms through impact"
- "Roll your wrists through impact"
- "Hold your wrists square to the target as long as possible"
Since none of these statements make much sense, in this section, I would like to dig deep and hone in on two release methods which 99% of golfers can use and benefit from. Although some instructors will argue that one release is better than the other, I tend to believe that a golfer can make either of them work equally well. You will begin to see where this debate comes from as I explain the two release methods in more detail.
First, we need to understand another concept from The Golfing Machine by Homer Kelley. This is the concept of "hinge actions" (aka release actions).
The Three Hinge Actions
In his work, Homer Kelley defined three primary hinge actions which a golfer can use for various purposes around the green:
- Horizontal Hinging
- Angled Hinging
- Vertical Hinging
All three of these can be used around the greens to vary the trajectory of the shot, but it is recommended that a golfer stick to one for all full swing shots (at least until they become highly competent golfers). These three hinge actions describe how the left forearm and shoulder move after impact. During the first half of the impact interval we talked about how the forearms must pronate/supinate to some degree in order to return the club-head to the ball squarely. In this second half of the impact interval, a golfer has the option of what he/she wants to do with the club-face. Below, I have included a short video which demonstrates these three hinge actions:
In this video, pay close attention to the orientation of the club-face and the back of my geometrically flat left wrist in the follow-through. The backswing is not important here, because it is the characteristics of the follow-through that we are studying. For a more in-depth explanation of these three hinge actions, watch the video below where Lynn Blake explains the concept:
From now on, I will not be discussing the vertical hinging action, as it is nearly impossible to use during a full golf swing. Although it can be used effectively in the short game, that is not the purpose of this instructional series.
Release #1: Power Release
This first release is the most common release that you will see on the PGA Tour, which some advocates of pure ballstriking disagree with due to the large amount of closing of the clubface past impact. As a golfer myself, I can see why some instructors tend to dislike this particular release, but I personally find it much easier to execute than the second release which I will cover later.
The first release is called a "power" release because it utilizes horizontal hinging, which creates maximum force through impact. See it below:
There are a few key characteristics of this release which can be seen in the photo above. First, notice how the torso is pointing out to right field, and the arms are quite high at the P8 position (clubshaft parallel to ground). Also, notice how the geometrically flat left wrist is flush to the plane line. For a golfer who uses a neutral grip like Jason Day, this will also mean that the clubface will be roughly flush to the plane. As you can see in the photo, there is a bit of parallax in this video capture, which is making the clubshaft appear slightly below the plane, and the clubface slightly shut.
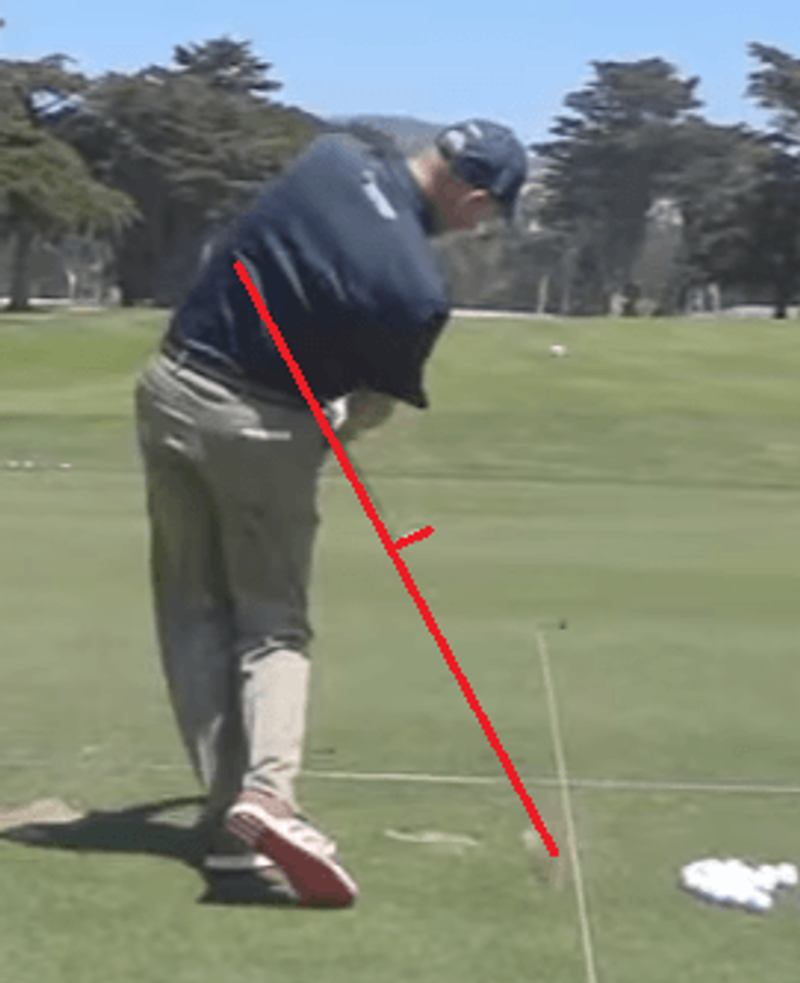
Into the follow through, this release will force the club on a plane close to parallel of the impact plane. I personally use this release, and you can see what I am talking about in the photo sequence of my impact and follow through planes:

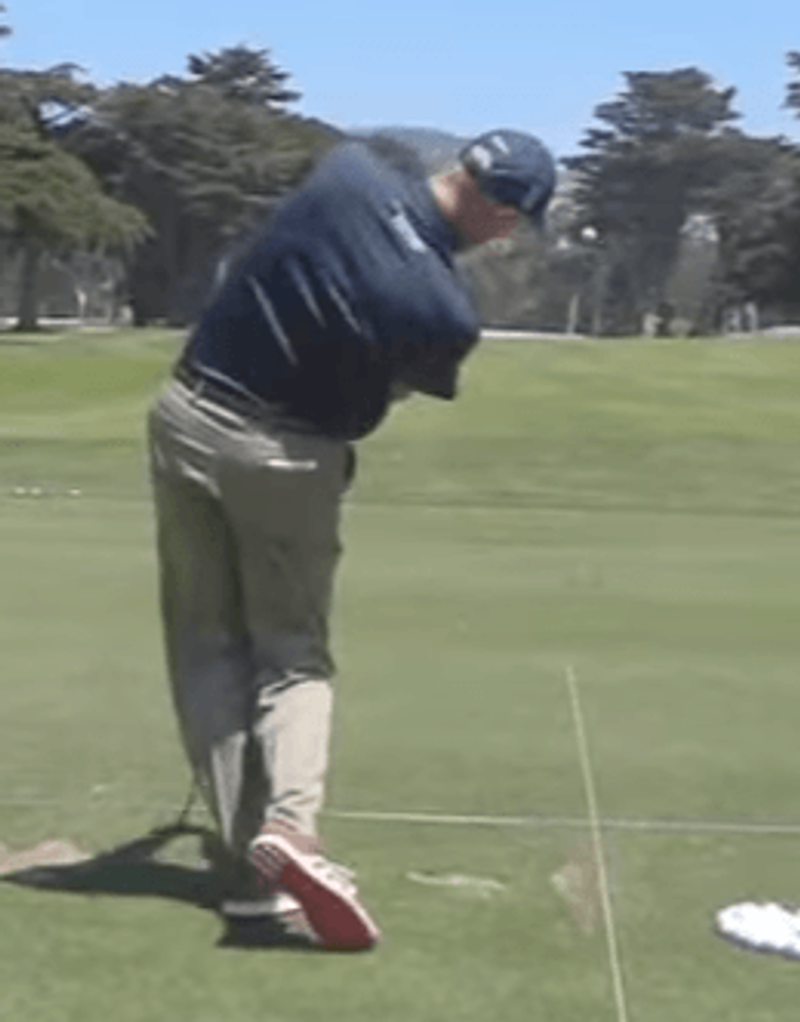
Finally, after this position has been reached, the flying wedges will be destroyed as the golfer poses in the finish position:
Release #2: Finesse Release
The second release is the classic "Hogan Release," and is when a golfer uses an angled hinge while aggressively rotating the upper torso through the golf ball. With this release, the club will disappear from the DTL view at P8, and the geometrically flat left wrist will remain perpendicular to the plane line:
You cannot see it in the photo above, but Jim's geometrically flat left wrist is perpendicular to the plane line, and since he uses a neutral grip, his clubface is also perpendicular to the plane line. This is the classic "angled hinging" that Homer Kelley describes.
The next photo is Jim in the P8 position:
As you can see, the club is completely out of sight from this camera angle, and the upper body has rotated a great deal. Into the finish, this forces the club on a steeper plane than the rest of the swing, and a golfer with a finesse release should see the club in a near vertical position as shown in the following picture:

After this, the club will fold into a finish position, which is highly variable from golfer to golfer.
Comparison of the Releases
Take a look at the "power release" vs. "finesse release" comparison at the P8 position below:
See how Jason's upper body is facing out in right field while Jim Furyk's upper body is nearly facing the target. This is a key difference between the releases.
The finesse release requires a golfer to rotate the upper body a great deal in order to keep the club "on-plane" and in front of the body. If the upper body were to stop rotating, the arms would be thrown across the chest and would result in quite a jerky movement. As a result of this rapid turning of the torso with the finesse release, the club will be slightly lower at the P8 position.

In the above photo, there are two things to notice. First, you can see how Jason Day (power release) has not rotated his upper torso much in comparison to Jim Furyk (finesse release), who is almost facing the target in this same position. Second, notice how Jim's hands and club are slightly lower than Jason's as a result of this release type.
Which Release Type Should I Use?
Now we must ask the question of which release type is best for you! Depending on grip type, body type, and various other factors, one release may suit your game better.
Grip Type
Since the release technically happens after the ball is struck, you can get away with any grip-release combination. That being said, I do believe there are a few combinations that work well together.
If you are using a neutral grip, a power release is a good option. This is because the power release is characterized by a full 180 degree pronation/supination of the forearms through the impact interval, and by using the power release, you are simply continuing a rhythmic pronation/supination throughout the entire impact interval. If you were to use the finesse release with the neutral grip, this would mean that in the first half of the impact interval, the left forearm would be supinating 90 degrees, and then in the second half, due to the angled hinge release, the left forearm would have to slow down the supination, which I believe puts a lot of stress on the body. Like I said, a finesse release with a neutral grip can work, but it is quite difficult. Hogan was a rare example of a golfer who successfully implemented a neutral grip with an angled hinge release.
If you are using a strong grip, a finesse release is a good option (assuming you are powerful enough to make that aggressive upper body turning characteristic of the finesse release). With a strong grip, a golfer is not supinating the left wrist in the first half of the impact interval to a great degree (otherwise the club would be closed at impact), and to continue this limited supinating movement in the follow through, a finesse release must occur. In theory, this combination seems to be quite functional, as it involves the smallest amount of forearm supination/pronation through the impact interval of all the release combinations (of course while still remaining "on-plane").
If you are using a weak grip, I highly recommend using the power release. This is simply because using a finesse release with a weak grip will make it quite difficult to draw the golf ball without making large setup adjustments. Additionally, since the finesse release is slightly less powerful, and the weak grip is also a less powerful grip, you are possibly sacrificing a lot of distance with this combination. I don't know many golfers who use a weak grip in the first place, so this shouldn't apply to most reading this.
As for my non-recommended combinations (strong grip with power release and neutral grip with finesse release), you will just have to do a good amount of practicing. Of the two, I'd rather see a golfer use a neutral grip with a finesse release, because it doesn't involve such a rapid closing of the clubface in the follow through like the strong grip/power release combination does.
Flexibility and Strength
This is fairly intuitive, but if you are not strong and flexible, it is going to be awfully difficult to execute the finesse release. This is simply due to the large amount of upper body rotation that must occur during this release.
Recap
In this post, we have covered how the power accumulators release in the first half of the impact interval, and what impact should look like. We have also covered the different hinge actions layed out by Homer Kelley in The Golfing Machine, and applied them to both the "power release" and the "finesse release." I have attempted to keep everything as simple and to-the-point as possible, since this subject can quickly result in digressions and trivial details. There are so many things that an instructor can analyze during this portion of the golf swing, but over my years of competitive golf, I have found most of them to be entirely useless.