
In the last chapter about the transition, I talked a bit about the downswing, and we established that the golfer has no conscious control of the golf swing once the downswing has started. Devoting several thousands words to a movement that we can't even consciously control may seem quite superfluous, but it is important to understand, because we can practice these motions through the use of training aids and video analysis.
So far, we have covered the interval between P4 and P5, which constitutes the "transition" of the golf swing. Before going any further, I would like to introduce a concept which has been tremendously helpful to furthering my understanding of the downswing in golf, and I hope it will yours too. This is the concept of "power accumulators."
Power Accumulators and Pressure Points Introduction
This was originally introduced to the golfing world by Homer Kelley, the author of The Golfing Machine. He wrote in his book that there are four "power accumulators," and depending on the type of golf swing you have, different power accumulators will be used at different points of the golf swing. In addition, there are four pressure points that coincide with each individual power accumulator. They allow the golfer to "feel" the power of the golf swing, and various pressure points are (according to Mr. Kelley) supposed to be directed along certain paths of motion in the golf swing. I will not devote an independent section to these pressure points, because they should be understood in conjunction with the power accumulator concept.
Below are the four power accumulators and their complementary pressure points represented by pictures:

Power accumulator 1 is the power derived from the straightening of the right arm through the swing. In the swing that I have been describing in this instructional series, this power accumulator is not used, or at least a negligible amount. Despite this, a golfer should still feel the pressure created at PP3 shown in this photo, especially during the transition.

Power accumulator 2 is the power derived from the "cocking" and "uncocking" of the left wrist throughout the golf swing. In the photo, you can see the accumulator being created in the backswing. During the downswing, this angle will decrease, or in other words, the power accumulator will "release." When the left wrist cocks in the backswing, the golfer will feel increased pressure between the top of the left thumb and life-line of the right hand (PP1).

Power accumulator 3 is the power derived from pronating/supinating (rolling) the hands through the impact zone. Technically, they do not have an "in-line" and "out-of-line" condition, but I have labeled them as such in order to simplify things. When the hands go from the right hand supinated position (just before impact) to the square position, power has been released. This is by far the trickiest power accumulator to understand, but is quite useful to understand, as you can "zero out" this accumulator with many short game shots to produce softer shots. For those confused about this accumulator, I will go more in depth later in the post.

Power accumulator 4 is the power derived from the decreasing angle of the shoulder-left arm relationship. In other words, this is our centrifugal force in the golf swing as explained by the two-lever model. This is the main power accumulator in the golf swing I am teaching in this instructional series.
It may help to open these images in a new tab and reference back to them while reading this post.
The Purpose of Power Accumulators
It sounds obvious to me now, but when I first starting learning the golf swing and The Golfing Machine, I didn't understand what a "power accumulator" was. After hearing all sorts of theories as to what powers the golf swing, I never thought that there could be four definable sources of power in the golf swing that could be manipulated to produce various golf shots.
Of course, there is still debate as to what really powers the golf swing, and I believe that limiting power in the golf swing to four sources is a bit of a stretch. Nevertheless, by honing in on these four power accumulators, I believe a golfer will eliminate a good amount of frustration when it comes to gaining distance. A golfer with this knowledge will no longer go searching for better golf clubs or gimmicky drills that promise longer drives. They won't hurt themselves any longer trying to swing out of their shoes, because they know that this is actually a loss of power.
Additionally, a golfer who understands the power accumulators will have much greater creativity around the greens. For example, by eliminating PA3 through a grip alteration, a golfer can immediately improve their distance control on bump and run chip shots (this will make sense after reading the post).
I know this concept may sound rather meaningless at first, but I advise that you stick with it, because it is a building block to the rest of the downswing instructional content. I will be referencing to the power accumulators frequently, and expect that you have a sufficient understanding to interpret them in the context of the downswing.
Power Package Overview
In The Golfing Machine, Homer Kelley explains the power accumulation process in five steps:
- Accumulation
- Loading
- Storing
- Delivering
- Releasing
These steps all refer to different parts of the golf swing, and Mr. Kelley makes it clear that they should remain separate entities, despite the fact that they all overlap in some way. The Golfing Machine is notorious for being difficult to interpret, so I will be presenting these five stages in the context of modern day thinking.
All five of these phases are based around the establishment of the "power package," which is far less complex than it sounds. In my post about the two-lever model, I talked about a golf swing which is based on the manipulation of the left arm and club-shaft. The "power package" is simply a way of describing a structural makeup of this left arm through the idea of a triangle. The straight left arm forms one side of the triangle, the shoulders the second, and a line drawn from the right wrist to right shoulder the third:

I have illustrated how the power package is altered during different parts of the swing (P1, P2, P3). As you may notice, the shape of the triangle is becoming narrower as the backswing progresses. This is simply a manifestation of stage one (power accumulation), and is perfectly okay.
The five stages are Mr. Kelley's method of discussing how this power package is used in the golf swing.
Extensor Action
An important concept that coincides with the "power package" is called extensor action, which is the means of keeping the power package intact (left arm remaining straight). "Extensor action" is the feeling of the right arm trying to straighten throughout the swing. Obviously, the right arm should not literally straighten, but by feeling this tension throughout the swing, the left arm remains straightened, and the power package intact.
To feel this, stand in an address posture without a golf club. Now, with your right hand, grip only the thumb of the left hand. Now, make a swing keeping the left arm straight. You will feel your left thumb being pulled. This is extensor action.
I personally don't find it advantageous to consciously think about this extensor action at any point of the swing, because I tend to exaggerate it too much and throw other parts of my swing off. Do what works for you, but realize that this is a key part of keeping the power package intact.
Stage 1: Power Accumulation
During this first stage, it is important for a golfer to understand the functionality of the power accumulators. Homer states that when the power accumulators are in their "out of line" condition, they have immense amounts of potential energy which can be converted into kinetic energy by attaining the "in line" conditions.
In the photos of each power accumulator at the beginning of the post, I have labeled the "in-line" and "out-of-line" conditions. During the power accumulation stage (backswing), the power accumulators are becoming more "out-of-line," and reach their maximum "out-of-line" positions roughly at the top of the golf swing. In the downswing, they begin to return to their "in-line" positions, and release large amounts of power as a result.
Stage 2: Power Loading
Power loading is essentially the method that you use to establish the power package in the backswing, and can be associated with the concept of "lag."
Power loading can happen gradually or abruptly, based on which type of takeaway method you use. If you are using a one-piece takeaway, this leads to a "delayed wrist-cock," which means the entire power package is not assembled until late in the backswing. If you are using a right-arm takeaway, this will naturally create an earlier assembly of the power package in the backswing.
A golfer will feel the power loading at the moment the swing changes direction (transition), as the hips initiate the downswing, and the upper body "lags" behind it.
Below is a video of a Bubba Watson, who loads the power package very late in the backswing:
This next video is David Toms, who loads the power package quite early in the swing:
k" start={8} Notice how David Toms _gradually radially deviates the left wrist throughout the entire backswing. You can see how he has fully established his power package just prior to the top of the golf swing.
If all this doesn't sound applicable, that is okay. A golfer shouldn't be concerned with consciously trying to load the power package, but rather notice it, and feel it during the swing. By becoming aware of the pressures created by this loading phase, a golfer can better sense the club in his/her hands.
Stage 3: Power Storage
The third stage of the power package assembly is the power storage, which is synonymous to the concept of the "hip bump" in the transition.. As long as the golfer successfully executes this move, and avoids the "over the top" move that results from a "round-housing" of the hips during the early downswing, the power package has remained intact.
As you can see in the photo below, Tiger has kept all his power accumulators in their maximum "out-of-line" positions (you can see the angle of the red lines which represent PA2), and the triangle is intact:

Power storage is essential because an early release of the accumulators (especially PA2) will decrease distance tremendously.
Stage 4: Power Delivery
The fourth stage of the power package is the interval between P5 and P6 of the golf swing. It is remarkably similar to stage 3, as the power package should still be intact at this point, but goes further to describe how the power package should be delivered to the release point (P6) and through impact (P7).
During this particular section, Homer Kelley talks a good amount about the "aiming point," which is the spot on the ground near the ball which a golfer is supposed to aim his/her PP3 at during the downswing. Additionally, a golfer is supposed to bring his/her hands down in a straight line motion towards the aiming point. As an example, take a look at the photo below:
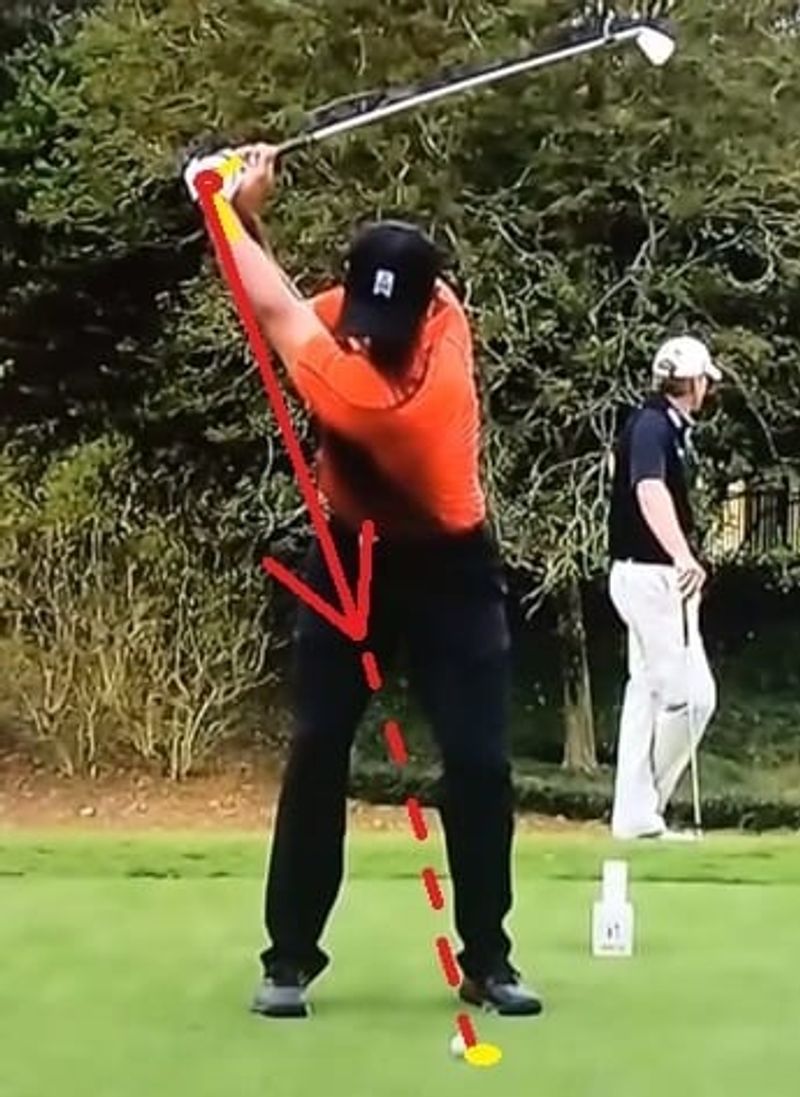
Essentially, Mr. Kelley says that a golfer should direct PP3 along the arrow's path, which is pointing at an "aiming point" somewhere along the ground. This is supposed to "deliver" the power package to the release position (P6), whereby the power package automatically releases towards the aiming point.
I only partially agree with this concept.
Personally, I don't find it effective to attempt to "guide" PP3 in a specific direction, because it causes several problems in other areas of my swing. I assume that some golfers would have success with this, but I simply have not been able to fully adopt Mr. Kelley's "aiming point" delivery concept.
That being said, I find this idea extremely useful when hitting low punch shots. When placing the ball back in the stance, it is tempting to swing inside to out in order to hit the ball solidly. Unfortunately, this just causes a push that goes fairly high in the air. When playing punch shots, I find it useful to pretend the ball is forward in my stance (aiming point concept), and swing normally. I do not consciously think about my third pressure point while doing this like Homer Kelley recommends. It is simply my own iteration of the aiming point concept.
As it may appear, this power package delivery stage is largely dependent on the individual and how he/she interprets it, and requires a great amount of experimentation (which Homer Kelley does acknowledge) before it becomes useful. For those just starting out who have poor swing mechanics, I do not recommend trying to implement this concept. I believe this is a good refinement to an already developed golf swing, but will only create confusion in a beginner's swing.
Stage 5: Power Package Release
The final stage of powering the golf swing is the release, which is the area during the swing which the entire power package should return to "in-line" conditions, and the club-head will accelerate and reach the ball with high velocity. This happens between P6 and P7, and continues from P7 to P8.
The entire release of the power package is automatic, and is not something that a golfer should consciously attempt to manipulate during the release.
How the Club-head Releases
From P6-P8 (impact interval), all three of the power accumulators will achieve "in-line" condition, meaning that they have fully converted potential energy into kinetic energy.
During this interval, they release in a specific order, which is critical for a golfer to train his/her swing to do. If they release out of order, the power package is destroyed, and the golfer will struggle to obtain distance on their golf shots.
In the type of golf swing that I am teaching during this instructional series, the accumulators release in the order of 4, 2, 3. In the photo sequence below I have attempted to explain the release sequence.
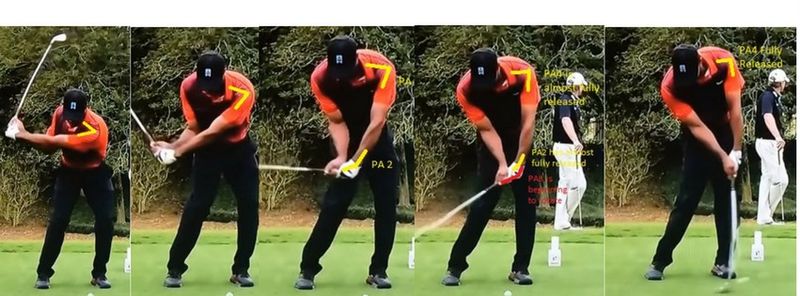
Notice how the angle of PA4 (left armpit) is increasing until it reaches its fully released position at impact. This release starts at some point in the mid-downswing, and continues to release through impact. Next, PA2 begins to release just prior to P6, and fully releases by P7 (although it is quite difficult to illustrate by photos). Shortly after PA2 begins releasing (wrist uncocking), PA3 begins to rotate (rotating the forearms to square the club face through impact). By P7 (impact), all of the power accumulators used in this swing have more or less released (achieved their "in-line" conditions).
Some instructors argue that PA1 comes into play during the impact interval, and endlessly debate over whether or not the right arm straightening after impact creates extra power. I personally believe that the right arm assists the club when it faces resistance (as seen in this video), but does not actively provide power. It simply acts as a "support" which helps the left arm keep the club-face steady through impact.
I believe it is rather futile to debate what the right arm does though. What a golfer needs to understand is the order the three PAs release, and some of the implications of releasing in the wrong order:
- If PA2 releases too early, the golfer faces a "casting" movement, which is characteristic of the "over the top" move. If PA2 releases too late (this is essentially impossible), the golfer could theoretically swing over the golf ball. I strongly believe a golfer should avoid worrying about releasing PA2 too late. Sergio Garcia is the only golfer I have ever seen who even comes close to releasing PA2 too late. He has always been known for his ability to generate massive amounts of lag, which is simply another way of saying that he delays the release of PA2 longer than the majority of golfers.
- If PA3 releases too early (late), the club-face will be shut (open) at impact. Releasing PA3 happens naturally as the result of centrifugal force and on plane movements.
- PA4 releases as the result of centrifugal force, and is completely driven by the pivot (lower body rotation and lateral movement). If the hips out-race the upper body or vice-versa, the release of PA4 will be altered.
Recap
In this post, I have described the basics of the "power accumulators," "power package," and "lag." I have not described any specific method for executing these concepts though, and will be doing so in the remainder of the instructional series. During each section of the downswing, I will be integrating the concepts explained above which will hopefully allow for a full circle understanding of the downswing.