If I had to guess, like most golfers, you probably lack a clear understanding of how to stand over the golf ball. How far away should one stand? How much bend should the knees have? Is it the same for everyone? What about the alignments of the shoulders, hips, and knees?
In general, understanding posture and alignment is not difficult compared to other concepts in the golf swing. Despite this, these two components of the setup will make or break your golf game. By setting up in the correct posture with the correct alignments of different body parts, you at least give yourself a chance at hitting a solid golf shot. Golf is already difficult, so let's not make it harder by starting off incorrectly. Having faulty posture and alignment is like showing up to a job interview with a big mustard stain on your shirt and holes in your shoes. Sure, you might still get the job, but only if you do something special during that interview.
How to Achieve Perfect Posture and Alignment
In order to achieve a satisfactory posture and alignment, there are three things that need to happen:
- The lengths and lies of your equipment must be properly fitted to your body type
- You must set your body properly to these golf clubs
- You must teach your body to feel where it is aimed in relationship to the target line
I have found two methods to achieving proper posture and alignment:
Method #1
The first way that one can achieve a perfect posture is by copying a PGA Tour pro's posture. Simple enough? I suggest looking at Jason Day, Tiger Woods, Adam Scott, or essentially any professional golfer with a similar build to you.
Look at a picture of their posture from both a down-the-line and face-on view (you can take a screenshot of a YouTube video), and then stand in front of a mirror and practice.
This is a fairly accurate way to get into a good posture, although not preferable by some, because it does not explain anything. Personally, I would like to know why I should bend my knees a certain amount, and why my spine should tilt backwards slightly. That way, I have the knowledge required to look at my posture and know whether it is correct or not without comparing it to someone else's posture.
As far as alignment goes, it would be rather detrimental to copy a PGA Tour pro's, because depending on the camera angle, alignment can become a tricky subject.
Method #2
The second way to achieve good posture and alignment will require an understanding of what constitutes this posture/alignment in the first place. There are a few key factors that must be covered.
Knee Bend, Orientation of the Spine, Weight Distribution
We will start with the factors that trouble the majority of golfers to the greatest degree. These three factors are the basic makeup of what we call "posture." They all influence each other, and work together to allow the golfer to make a powerful and stable golf swing.
Let's start with knee bend.
Finding the proper amount of knee bend is not all that difficult, and for many athletes, is quite natural. In the golf swing, the explicit amount of knee bend is far less than that of other sports. In tennis, or baseball, athletes will bend a great amount at the knees to allow explosive and agile movements. In golf, we want these same movements, but in lesser degree, mainly because accuracy is paramount to shooting good golf scores. In order to find the proper knee bend, I suggest using a DTL view of your setup. Use the V1 Video Analysis app, and draw a straight line from the middle of the balls of your feet directly vertical past the level of the knees as shown in the photo below:
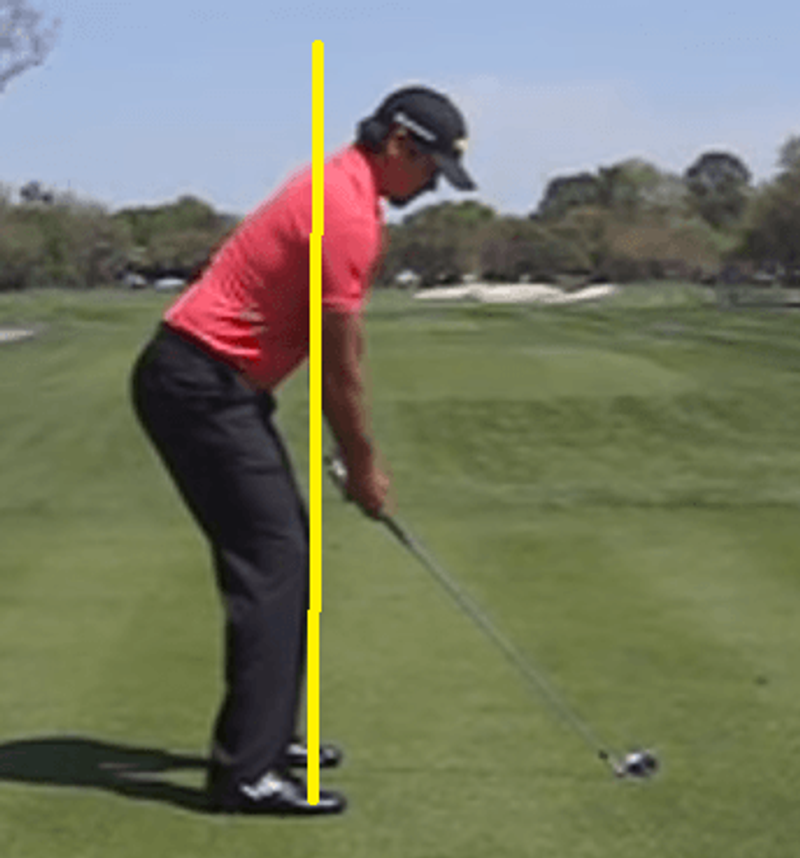
A proper amount of knee bend will be somewhere along this line, or slightly over/inside of it. It is not mandatory that a golfer bend their knees perfectly on this line, but large deviations from it will cause havoc in the golf swing, especially when a golfer locks his/her knees.
Although one can achieve this lower body position while maintaining a perfectly vertical upper body position, it is far from comfortable. In the golf swing, we need to bend forward at the hips to allow a proper weight distribution over the feet. This will keep us balanced throughout the golf swing. The correct amount of bend at the hips will roughly align the shoulders with the knees, although it is acceptable for the shoulders to lean forward slightly more than the knees, but not the opposite.
There is something to be said about the bending of the upper body. Many golfers struggle with this, and mistakenly curve their lower back at address, while keeping their upper back straight. No matter who you are, you cannot naturally keep your entire back straight, but the bend should be in the upper region rather than lower.
When practicing the correct posture, you may become slightly sore in the lower back, especially if you are used to sitting in a chair with bad posture. When standing over the golf ball with correct knee bend and hip bend, the lower region of the back should feel concave from the DTL perspective. The upper region of the back will feel far less rigid, and the arms will hang naturally below the shoulders. See the photo below:
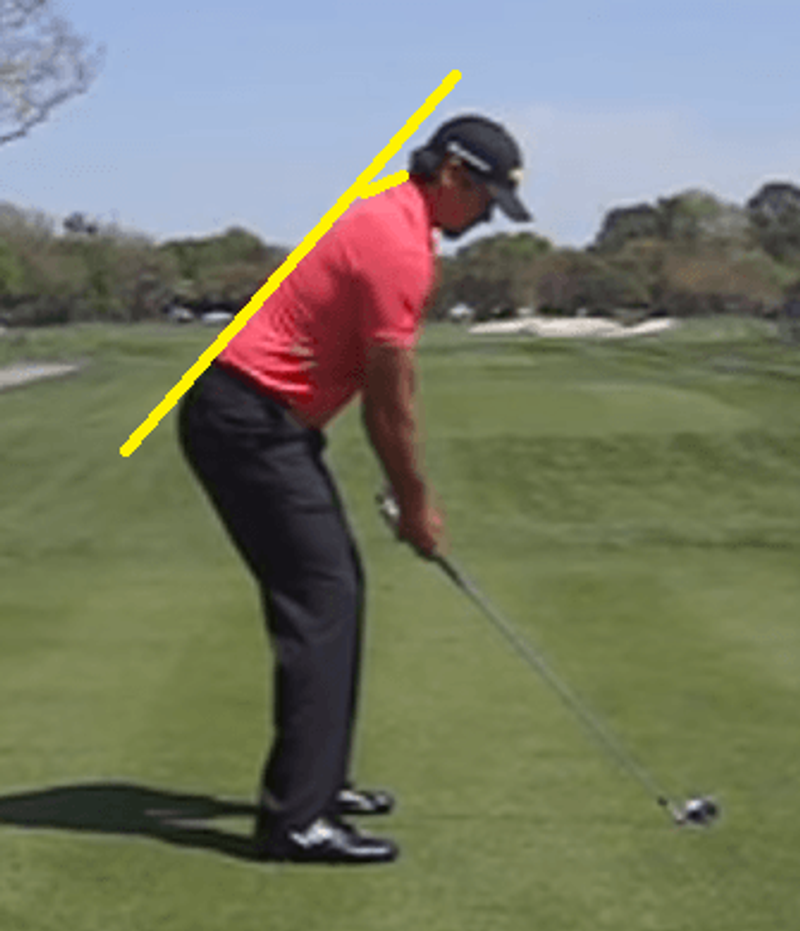
In the above photo, notice how the lower spine forms a perfectly straight line, while the upper spine bends (short yellow line).
Once a golfer has achieved proper knee bend, hip bend, and back alignments, the weight of your body should be fairly even between the heels and toes. If the weight isn't evenly distributed, there is something wrong with either the amount of knee bend, the amount of hip bend, or the orientation of the spine. Think of the weight distribution as a final check when setting up to the ball. If during a practice session you notice that your weight is favoring one side or the other, it is time to get out the video camera or mirror and check.
Also, note that your proper posture should dictate the lengths and lies of your equipment. When the knees and hips are bending properly, and the weight is evenly distributed between the heels and toes, the golf club should sit flush with the ground. If it doesn't, and you are sure that your posture is correct, then you might want to check/adjust the lengths/lies of your clubs. This subject can become quite detailed, so I recommend checking out my post on lie angles.
Finally, a golfer might wonder what kind of weight distribution they should feel between the right foot and the left foot at setup? Unlike the distribution between the heels and toes (which is fairly standard across all golfers), not all golfers set up with the same weight distribution between the two feet. It is often advised by golf instructors that a golfer setup with equal weight between the feet for mid irons, slightly favoring the right side for the driver, and slightly favoring the left side with the wedges. In the end, as long as the golfer remains close to a 50/50 setup, this element should not dramatically alter results of the golf swing. The weight distribution becomes far more important as the swing nears the impact position, where the majority of the weight should be over the lead foot.
Spinal Tilt
Once all is good from the DTL view of the setup, it is time to move to the FO view. In this view, we will be checking the spinal tilt, which is a highly confusing subject to most golfers. Like many aspects of golf, spinal tilt is not an intuitive concept.
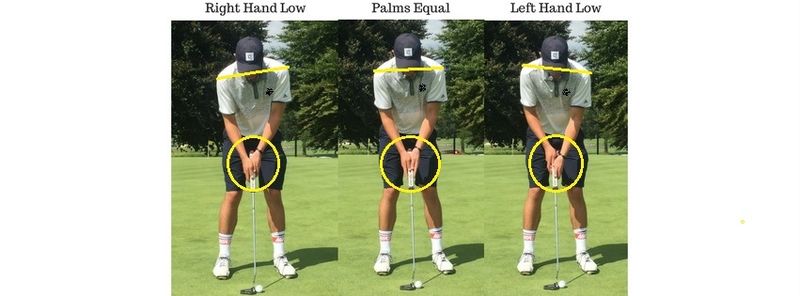
To start off, let's explore the reason we want spinal tilt in the setup. This spinal tilt is not some magical orientation of the body that happens because the Golf Gods decided it should. It happens due to the way that we hold the golf club, and our attempt to swing it on our "optimal plane" throughout the swing. When one hand sits lower on the grip than the other, it naturally forces a spinal tilt in order to stay in the same plane. A good way to understand this is through the use of a putter. Surely, you have seen golfers who putt with their hands perfectly equal on the grip. Notice how there is no spinal tilt with this setup. Now, think about what happens with a left hand low grip. The spine tilts to the left. Finally, with a "standard" grip, the spine tilts to the right.
This is all fairly easy to understand, but why does it matter that the spine tilts and both arms remain on the optimal plane at address? Couldn't a golfer quickly compensate during the backswing?
The simple answer is yes, but it proves far more difficult, and can often require unnatural movements to return the club to the optimal plane by the time it reaches the top of the backswing. Therefore, most golfers who fail to set up with both arms on plane (spinal tilt to left from FO view - picture 1 above) will need to make a compensatory move during the transition, which can only be mastered through long hours of practice. Furthermore, if a golfer fails to setup with the arms on plane during the setup in the full swing, he/she will tend to do so in the short game and putting as well. Unlike the full swing, there is far less time to compensate for off plane movements in these short strokes, and the golfer will likely suffer from an inconsistent short game. In the backswing portion of this instructional series, I will further elaborate on the benefits of setting up "on plane."
So how much spinal tilt is necessary in the setup? A great check for proper spinal tilt is by checking your body alignments.
Body Alignments and Procedure for Getting into a Perfect Setup
We have reached the final point of discussion in the setup portion of this post. So far, it has been established how a golfer should establish proper knee bend, hip bend, and spinal orientation over the ball, as well as the weight distribution that should be felt in this setup. Now, we will explore just how much spinal tilt is needed during the setup, the importance of body alignments, and how to properly assume these positions while addressing a golf ball.
The question of how much spinal tilt is not as relevant as one may think, because it is the effect of proper alignments. When a proper setup has been assumed, and the right forearm is "on plane," spinal tilt will occur naturally, and vary based on your weight distribution between the two feet, the width of the stance, and other trivial factors.
So if the amount of spinal tilt is less important than alignments, what are the proper alignments??
There are three primary alignments that a golfer must check during practice to ensure proper spinal tilt, and ultimately proper posture. Before going into each of them, we must understand an important concept when it comes to alignment, which is the "parallel left" rule. Since the body does not rest within the inclined plane that the club is propelled circularly on, it is not sufficient to align the body with the intended target. For now, let us assume that we are attempting to hit a perfectly straight golf shot to avoid unnecessary complications. In order to do so, it is preferable (but not 100% necessary - with proper manipulations you can indeed hit a straight golf shot with varying alignments) to align all parts of the body "parallel left" of the target line (aka the straight line base of the inclined plane). If a golfer tries to align the feet directly at the target, it will effectively act as a "closed" stance, which is another way of saying that the plane direction is aimed to the right of the target. This often results in an "over the top" motion during the swing, which will open the shoulders, and put the club back on the target line plane. After several weeks of practicing like this, the golfer will have formed a poor swing habit merely because he aligned incorrectly to the target.
In order to keep the body alignments "on plane," when using an alignment stick, one must aim it parallel left of the target. This is shown below:

You can observe that I have first placed a club along the intended target line, which is also the base of the inclined plane. Then, I have placed an alignment stick parallel to the club; roughly the distance I will be standing from the ball. The distance I place the second stick in relationship to the first is not as important as getting the first alignment stick perfectly aimed at the target, and making sure the second is parallel to it. See my post on how to analyze your own golf swing for a more detailed look at camera angles and alignments.
Now that I have covered the alignment process, I will be covering the methods for achieving proper individual alignments.
Proper Shoulder Alignment
You may be wondering why I haven't started with foot alignment, but I can assure you that where your feet are aimed is far less influential to the flight of the golf ball than where your shoulders are aimed. As we discussed previously in this instructional series, there are two factors that influence the curvature of the golf ball. Firstly, there is club-path, and secondly, there is club-face angle. The shoulder alignments during the setup are largely responsible for the club path, since the club naturally follows in plane with the shoulders. Although aligning the shoulders properly at address does not ensure that they remain aligned throughout the swing, it increases the likelihood significantly.
In both the short game and long game, aligning the shoulders "on plane" (parallel left of the target line) is a matter of practice and feel. A beginning golfer will feel awkward and uncomfortable aligning their shoulders on plane, but after several weeks/months of diligent practice, he/she will begin to develop an intuitive instinct for what the proper shoulder alignment feels like. As said previously, the shoulder alignments are directly related to spinal tilt, because depending on the width of the stance (which should vary club to club), the spinal tilt will change. This ensures that the right forearm is able to remain on plane, which inevitably puts the shoulders on plane (properly aligned).
Proper Foot Alignments
I believe the second most important alignment to consider is foot alignment. This is because if the shoulders and the feet are aligned, the third alignment (hips) will naturally fall into the correct spot.
Also, foot alignment is the only alignment of the three which a golfer can practice without the use of a video camera. With foot alignment, all the golfer needs to do is set an alignment stick on the ground, and hit balls with it. Personally, I spend over 50% of my practice time with an alignment stick on the ground so when I go to the course, I instinctively know where my body (or at least my lower body) is aimed, and can remove that variable.
Proper Hip Alignments
The last alignment to consider is hip alignment. As I said, this alignment should fall into place if the other two are correct, so I will not go into detail about it.
The only way hip alignment can get out of order is if your knee bend or weight distribution is thrown off in the setup, which should rarely happen if you are frequently monitoring your setup.
Handling Uneven Lies
So far, I have covered the basic setup of the golf swing, but only for a golfer who is hitting off perfectly flat ground. In this section, I will be covering some of the adjustments that must be made for uneven lies.
Please note that on varying lies, the basic fundamentals of the setup will not change. The only factors that should change dramatically are weight distribution and ball position, thanks to the uneven ground altering the low point of the golf swing, and providing an unstable base to swing on.
Uphill/Downhill Lies
Uphill and downhill lies can often be difficult in certain situations, but overall, a golfer should not fear them. The key to successfully playing uphill and downhill lies is leaning with the slope.
In addition, one should widen his/her stance to create a more stable base to swing on, and finally position the ball in a comfortable position. Generally, I find it more comfortable to place the ball back in the stance on a downhill lie, and up in the stance on an uphill lie. To clear some ambiguity, I will go through a few considerations for each type of lie.
Handling the Uphill Lie
The main concern for many golfers with the uphill lie is the fact that their weight distribution is favoring the back foot, which brings in thoughts of chunking the ball. To compensate for this thought, many golfers will make an extra attempt to shift the weight forward during the downswing, causing an over the top move, producing some sort of pull. It is important to trust that the uneven weight distribution will produce the intended result.
Although it may seem intuitive, it is also important to remember to take extra club when hitting from an uphill lie, because the dynamic loft of the club at impact will be greater than on flat ground, you will have less stability to produce high swing speeds, and the ball will tend to stop more quickly on the greens.
Handling the Downhill Lie**
I believe that downhill lies trouble golfers more than their counterpart because of the weight distribution favoring the front foot at address. Since the golf swing requires you to shift your weight forward, it almost feels that a downhill lie will cause you to fall down the hill! What many golfers will do is resist this tendency to fall forward, and will end up leaning back and either topping, blading, or chunking the shot.
Watch what Gary Player does on this downhill lie:
Sometimes, if the slope is steep enough, you will have to "walk through" the shot because not only do you have your weight set forward at address, but the downswing creates momentum towards the front foot.
Additionally, on a downhill lie, the ball will travel a further distance with less loft/spin because the dynamic loft of the club has decreased.
Side-hill Lies
In my opinion, side-hill lies are less difficult than uphill/downhill lies because the only compensation you are making in your setup is the amount of knee bend and heel-toe weight distribution.
Hitting with the ball above feet
When the ball is above the feet, the club face will naturally point left of the target because the lie angle has changed. As I have explained in the D-Plane post as well as earlier in this one, this will cause the ball to start left and draw/hook. To compensate, when the ball is above your feet, you will need to aim a significant distance to the right of the target (unless the ball is in the rough, which results in less of a draw/hook thanks to decreased spin).
Additionally, while the ball is above your feet, you should choke down on the club, stand tall, and feel the weight on the toes of your feet to avoid falling backwards during the swing. Unlike the uphill/downhill lies, you do not want to lean with the slope because this will cause you to fall backwards, away from the ball during the swing.
In general, ball position can remain the same as a normal shot, although I tend to place it a bit back in the stance to ensure solid contact.
Hitting with the ball below feet
When the ball is below the feet, the club face will naturally point right of the target. To compensate, you should aim left of the target, but to a lesser degree than when the ball was above the feet. When the ball is above your feet, it is much easier to swing around the body and contact the ball solidly, with the club's sole flush to the ground. When the ball is below your feet, the tendency is to contact the ball with the toe slightly above the ground, which decreases the amount which the club face aims right of the target.
Also, you should bend the knees more, make sure your hands are at the end of the grip, and feel the weight on the heels to counteract the slope. During the swing, the tendency will be to "stand up," but you must resist this and keep the knees flexed throughout the swing.
Lastly, ball position can remain the same as a normal shot, but is often advantageous to place the ball slightly further back in the stance to ensure solid contact.
Combinations of Uphill/Downhill/Sidehill Lies
In most situations, the slope will be a combination of both an uphill/downhill and side-hill lie. There is no magic setup for these situations, and it helps to have experience and a solid understanding of how to play uphill/downhill and side-hill lies. Eventually, you should instinctively be able to setup to any lie without much thought, but in the beginning, this is not the case. Be patient, and remember that golf is not supposed to be an easy sport :)
Shotmaking
By now, you should have a solid grasp of the basic fundamentals of the setup, and should be able to handle various sloping lies on the golf course. Now, we are going to take a detour and learn how different setups can produce different types of golf shots. The possibilities are endless, and this section will integrate a complete understanding of the concepts explained so far in this instructional series.
In golf, there are 4 different effects that you can add to a golf shot, being:
- Increased Loft
- Decreased Loft
- Draw
- Fade
If you understand how to setup to the golf ball in order to create each of these effects, you can then go about combining them into an entire repertoire of shots. Although setting up to the ball correctly will not guarantee that you pull off the intended shot, it certainly increases your chances.
Increased Loft
The first effect that we can produce is a high golf shot. In order to do this, a golfer must find a way to maximize dynamic loft as well as spin. More specifically, the golfer must find a way to maximize loft and spin while maintaining the flat left wrist that I talked about in my post about the Physics of the Golf Swing.
To do this, the golfer should place the ball as close to low-point as possible, and with a driver, slightly in front of low point. This is done by either widening the stance, or placing the ball forward without altering the stance. Additionally, the golfer must slightly close the stance in order to achieve a straight ball flight, as shifting the ball position closer to low point will also decrease the club path angle, favoring a fade.
I generally prefer widening the stance and keeping the ball in the same position, because it allows for a much more stable base.
Decreased Loft
Many golfers struggle to hit the ball low. This isn't surprising considering most golfers fail to maintain a flat left wrist and forward weight distribution at impact. It is important to understand that some golf swings simply won't allow for a low, penetrating ball flight, and no matter what these golfers do with their setup, the ball will always fly high in the air with spin.
Nevertheless, for those who have progressed a bit further with their swing, I will lay out a few keys for achieving a low ball flight.
Opposite to the high shot, a golfer can produce a lower shot by either putting the ball further back in the stance, or narrowing the stance. Additionally the golfer must slightly open the stance in order to achieve a straight ball flight, as shifting the ball position further away from low point will increase the club path angle, favoring a draw. You must shift the plane direction to the left (aka aim to the left) to "zero out" the club-path angle caused by the change in ball position.
Draw
A draw can be hit in many different ways; with the stance open, closed, or square, and with the ball forward or back in the stance. The key with the draw is to make sure that the plane direction (shoulder, hips, feet alignment) is right of the club-face at address, which is right of the target.
I find it easiest to first line the clubface up slightly right of the target (where the ball should start), and then align the body slightly right of this club face (causing the draw). If this doesn't make sense, I suggest re-reading the new ball flight laws post. This is contrary to much of the advice seen on the internet, which says to aim the club-face at the target, the body right of the club-face, and swing along the body line. With this advice, the ball will start at the target and draw to the left!
Once again, setting up like this will not automatically produce a draw. Some golf swings are not capable of hitting a draw without drastic compensations. In this case, the golfer should work on his/her swing mechanics before trying to purposefully hit draws and fades.
Fade
The fade is simply the opposite of the draw! Aim the club face slightly left of the target, and the body slightly left of the club face, and swing along the body line.
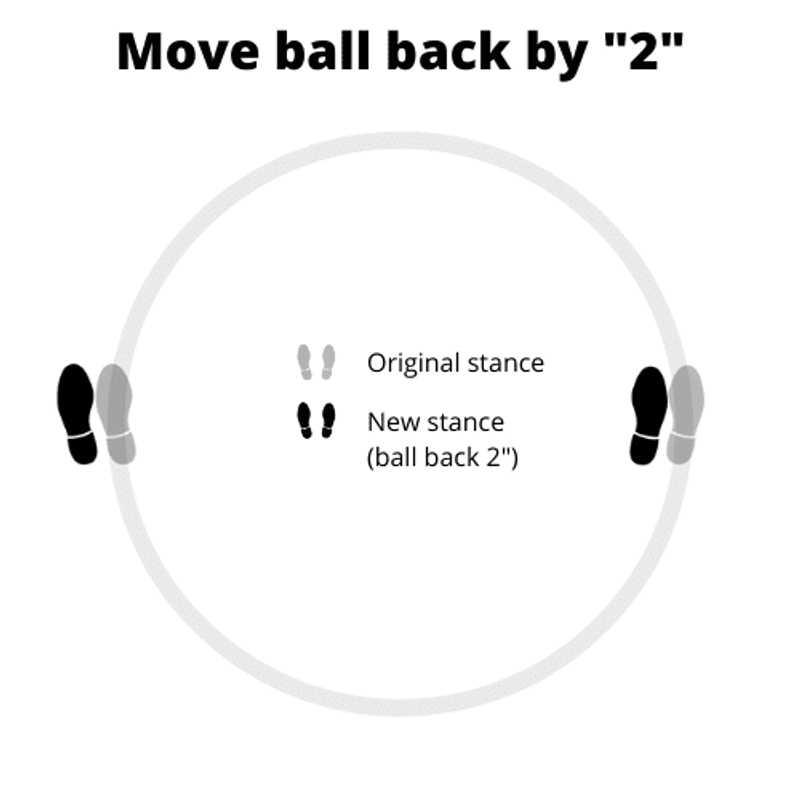
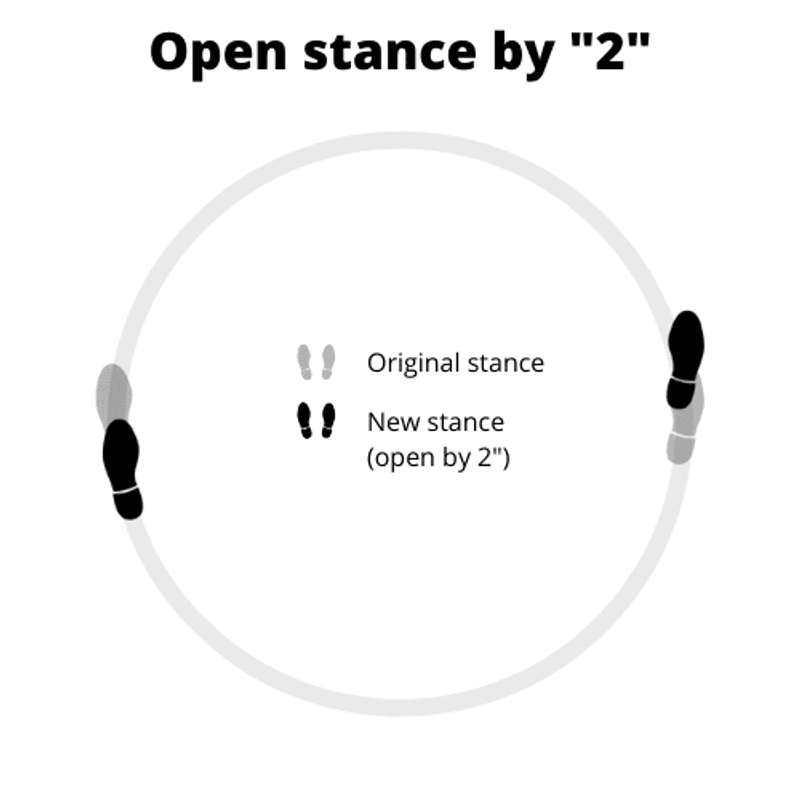
The 2-2-2 System
All this sounds easy in theory, but is far from it in real life. It took me several years before I could hit low draws, and I'm assuming that there are certain shots that give you trouble as well. In light of this, I wanted to share a simple shot-making system that I use, which calls on all the theory that I have stated in this instructional series.
This system is all based around a "standard setup," which I have honed over several years. This standard setup is simply a setup in which my entire body is aligned parallel left of the target, and I am trying to hit a perfectly straight shot, with my normal ball position (just inside the left heel for all shots - I simply move my right foot forward or backward depending on the club to alter the ball position as recommended by Ben Hogan in his instructional book). Every time I go to the range, I put an alignment stick down, and practice getting into this standard setup for at least 20 minutes:

This setup has become instinctual by now, and to hit specialty shots, all I have to do is adjust my ball position and stance in increments of 2 inches. I walk into the ball, and get set in my "standard setup." Then, I will alter my alignments for the desired shot. Below I have listed the various alterations that one can make in relation to the standard setup. In each of these, by opening/closing the stance, you are shifting the plane direction (base of the inclined plane), and by moving the ball position, you are altering the club path angle:
- High Draw - Move ball forward 2 inches, close stance 4 inches
- High Straight Shot - Move ball forward 2 inches, close stance 2 inches
- High Fade - Move ball forward 2 inches
- Low Draw - Move ball back 4 inches, open stance 2 inches, choke down 2 inches
- Low Straight Shot - Move ball back 2 inches, open stance 2 inches, choke down 2 inches
- Low Fade - Move ball back 2 inches, open stance 4 inches, choke down 2 inches
- Standard Draw - Close stance 2 inches
- Standard Straight Shot - "standard setup"
- Standard Fade - Open stance 2 inches
If one of these adjustments does not produce the desired ball flight, I first check my "standard setup" to make sure that my alignments, weight distribution, posture, and other various factors are in good shape. If these adjustments still don't produce the desired result, I know that there is something in my swing that must be attended to. By using this system, I am able to eliminate several variables from my golf game, and solely focus on improving my swing rather than constantly fidgeting with my setup over the ball.
Going deeper: The 2-2-2 System
I've had a couple of questions around the 222 system since publishing this post, so below I have explained it a little bit more extensively.
The first thing we have to be clear about with the 222 system is that it is not EXACT. If you try to make this an exact science, you will drive yourself crazy trying to implement the system.
As with EVERYTHING in golf, ask yourself: “Does this setup seem comfortable enough to strike this golf ball solidly?” If you can answer yes, then your setup is good. If no, then there is something in your setup or equipment that is wrong. It’s really easy for us golfers to stand over a ball trying to convince ourselves that our setup is correct despite it feeling wrong, and you’ve got to trust that instinct.
With that fact established, let's get a bit more clear on what it means to "move your feet forward 2 inches".
Within the 222 system, there are two ways that you can move:
- Opening/Closing the stance
- Shifting the ball position
Regardless of the movement, the stance width should remain constant.
I like to imagine that I am standing on a small platform with foot holds. The platform is allowed to rotate clockwise/counterclockwise or laterally (towards target/away from target). My feet are strapped into this platform, and to perform the 222 system, I just need to move my platform. Below are a few examples: