Although sandblasting can't improve your golf game in any way, it can spice up your bag and impress your weekend foursome. When I first learned about sandblasting, I got the impression that it was a process used for large metal parts to remove areas of rust, paint, and corrosion.
Of course these are all valid uses of sandblasting, but through my experimentation with golf clubs, I realized that I could use this technique to give a professional look to used golf clubs. Although it is an investment to set up, sandblasting is a quick, efficient way to turn an old club into a new one. In this post, I will take you through all the things that you need to purchase, the proper technique, and other considerations when sandblasting golf clubs.
Before we Start- Let's Distinguish Between Glass Beads and Aluminum Oxide
Before getting into various details about this technique, I wanted to clarify that "Sandblasting" and "Beadblasting" are the same thing, just using different blasting media. You'll learn more about this later down the page.
Below are pictures of each so that you can see the difference:
My Definition of Sandblasting
Essentially, sandblasting is a technique where you utilize air pressure to propel fine, abrasive media at a surface to achieve a uniform, professional-looking finish.
Materials Needed
For beadblasting and sandblasting, you will need an air compressor with certain minimum specifications to ensure it can handle the demands of these abrasive processes effectively. The main factors to consider are the air pressure (measured in pounds per square inch or PSI) and the air volume output (measured in cubic feet per minute or CFM). The compressor should be able to deliver a sufficient amount of compressed air at the required pressure to operate the blasting equipment efficiently.
Here are the minimum specs you should consider for an air compressor for beadblasting and sandblasting:
- Air Pressure (PSI) - this is how much pressure the compressor is pumping air at
- For beadblasting: The minimum recommended PSI is around 60-80 PSI.
- For sandblasting: The minimum recommended PSI is around 90-100 PSI.
- Air Volume Output (CFM) - this is the amount of air the compressor can move in one minute
- For beadblasting: The minimum recommended CFM is around 10-15 CFM at 90 PSI.
- For sandblasting: The minimum recommended CFM is around 10-20 CFM at 90 PSI.
Additionally, consider the following factors when choosing an air compressor:
- Duty Cycle: The duty cycle refers to the percentage of time the compressor can run within a given time frame. For continuous use in blasting applications, consider a compressor with a higher duty cycle.
- Tank Size: A larger air tank can help maintain a steady supply of compressed air and reduce the need for constant cycling of the compressor motor.
- Horsepower (HP): While not as critical as PSI and CFM, higher horsepower will generally allow the compressor to recover air pressure more quickly after heavy use.
- Portability and Space: Consider the size and weight of the compressor, especially if you need to move it around frequently or have limited workspace.
Unfortunately, to hit all of these requirements, you're looking at something far north of $1,000 for a compressor.
You could rent one, but I've found that compressors that fall short of these specs will still work for small jobs like putters. You may just have to do some waiting.
So here's what you'll need:
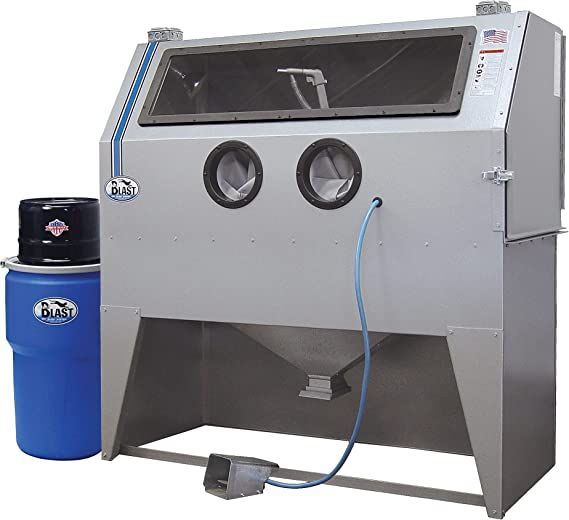
- Abrasive Sandblaster Cabinet- I know that some of you won't want to spend the money on a pre-made sandblasting cabinet, but I highly recommend it, or at least building your own. If you choose to skip the cabinet altogether, be sure to blast in an open area, and don't expect to recover your blasting media. In my opinion, blasting without a cabinet is a bigger waste of money over the long run. Please note that this cabinet is meant to be paired with the air compressor specs below.
- Air Compressor- Purchasing the right air compressor for the job can be a daunting task. When considering which one to buy, there are a few specs to keep in mind. You certainly do not need to meet all of the specs listed below to get the job done, but meeting these specs will make the job a lot quicker and less frustrating. The compressor that I have linked to is what I consider a "budget" option that will get the job done for golf clubs, but may not be what you are looking for if you want to do bigger sandblasting jobs around the house. Again, there is no perfect choice here. Just try and get close to the specs below:
- My recommendations (read below to see why)
- Best Option - Husky Stationary Electric Compressor, which maintains 11.5 CFM at 90 PSI. This is about the minimum you should go to have a reliable beadblasting and sandblasting experience.
- Budget option that you may get frustrated with but it will still probably get the job done fine -California Air Tools 10020C
- My recommendations (read below to see why)
- Blasting Media- there are various "medias" or abrasives that can be used. Here are the two that I use:
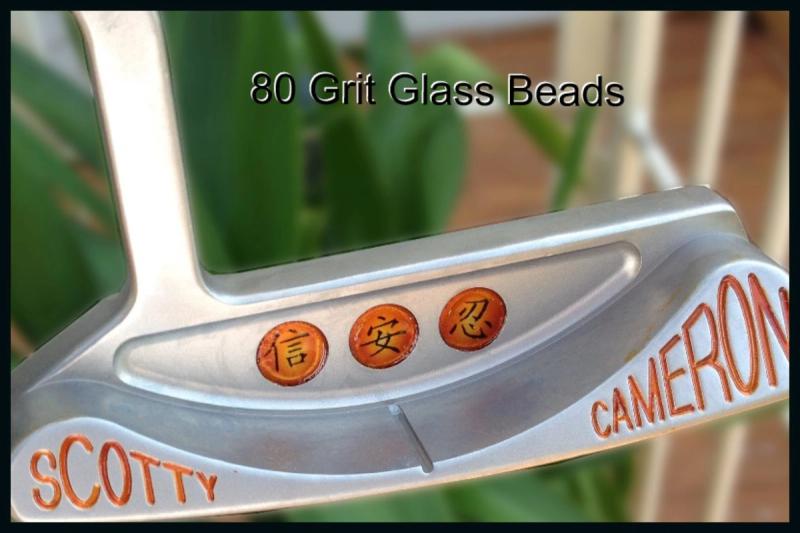
- Glass Beads- for general refinishing, you will need 80-120 grit glass beads. This will resemble the Scotty Cameron factory finish. I personally veer towards 80 grit with the glass beads, but anything in this stated range will produce good results.
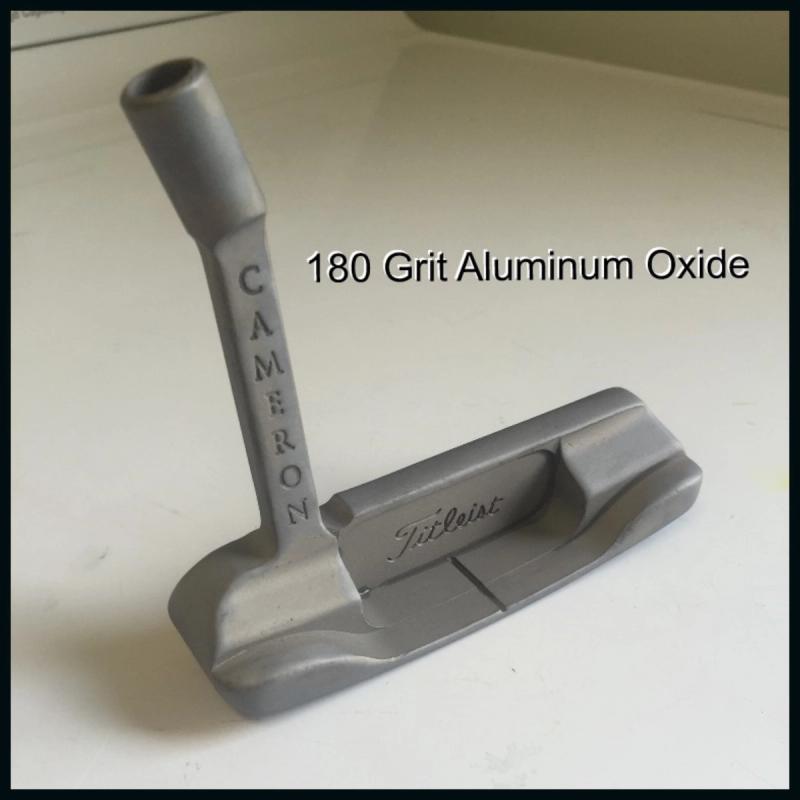
- Aluminum Oxide- for my polymer finish tutorial, you will need 180 grit aluminum oxide. This is otherwise known as "fine" aluminum oxide.
- Compressor Attachments- There are just a few small parts that you need to connect the air compressor to your cabinet. Some compressors (if purchased new) come with all the necessary parts. If you are purchasing a used compressor, I recommend purchasing a kit. Although you will receive a few parts that you don't need, I think purchasing a kit like this beats trying to purchase individual parts.
If you are bold enough to purchase the required materials, here is a quick video that will help you set up your cabinet with your compressor and sandblast:
I hope this post helps! Just a few things to remember when sandblasting (different than beadblasting):
- Blast at about 90-100 psi
- Use the correct media (glass beads vs. aluminum oxide)
- Blast AFTER you have removed all the nicks and dings!
- Always have the hose submerged in the blasting media
For bead blasting, use less PSI (somewhere in the 40-70 range).
Choosing the Right Media for your finish
Finishes That Use 80-120 Grit Glass Beads
- Satin Finish (I have linked to the sandblasting 101 page- just make sure you are using 80-120 grit glass beads!)
- Black Oxide
- Torching (before/after you torch)