
Overall Verdict
I highly recommend this product.
While this is a very tough read, if studied closely, reveals a complete framework for thinking about the golf swing and various teaching methodologies and swing methods.
Product detailsMy Rating
Pros and Cons
Pros
- Tons of insights
- Comprehensive
- Legendary
Cons
- VERY hard to read
Best for
Analytical GolfersThis product is best for analytical golfers who want to improve their game.
Product Features
My favorite feature
While this is a very tough read, if studied closely, reveals a complete framework for thinking about the golf swing and various teaching methodologies and swing methods.
If you have clicked on this post, you are either in great pain from attempting to read Homer Kelley's book, or you are about to be in great pain from reading it. If you have been in the golfing industry/world for long enough, surely you have stumbled across the title "The Golfing Machine." Several instructors across the globe have their GSEB or GSED certifications, tour players have mentioned it, and nearly every instructor (regardless of what they claim) teach at least some of the golfing machine concepts to their students.
The ambiguity associated with this book is widespread, and in order to understand the foreign dialect of English that Homer Kelley writes in, you will find yourself digging deep into internet forums, watching hundreds of YouTube videos, and most likely beating your head against a wall in agony.
In this post, I intend to clear some of the misunderstandings related to The Golfing Machine, answer some common questions, and provide additional resources to those who would like to take their education further by reading this beast on their own! By no means will this post explain the concepts within the Golfing Machine (I have partially done this in my instructional series), but will provide you with a basic understanding, and method for tackling this book on your own.
If all goes as planned, you successfully make it through The Golfing Machine, and review it several times, you should be able to understand every single word of the following (humorous) video:
Although the above video sounds absolutely ridiculous, the concepts that J.C. briefly mentions are unbelievably useful in building an effective and repeatable golf swing. I strongly recommend to those looking for serious improvement to struggle through this masterpiece of golfing wisdom. After reading the book 3 times, watching several related videos on YouTube, and implementing the concepts into my own game, **I can finally understand this satirical video! ** I hope the same for you.
Before getting into the contents of the book, I would like to mention that The Golfing Machine (TGM for short) is a systematic way of understanding the golf swing. Homer Kelley was a smart man, and his work illustrates this. In the text, he specifically mentions that he aims not to repeat information, and therefore cross-references abundantly throughout the book. Below is just a sample page which shows just how complicated the reading is, and how many cross-references to other parts of the book you will be dealing with while reading it.
While reading, you will literally feel as if you are running in an endless circle with blisters growing on your feet the longer you run. It is not for the faint-hearted but for the SERIOUS GOLFER.
To start, let's get an overview of the structure that Homer Kelley laid out to explain the concepts in The Golfing Machine.
Structure of The Golfing Machine
I can't lie, J.C. Anderson explained TGM quite well in his satirical video earlier in this post, but I will do my best to provide additional insight. Essentially, Homer Kelley believed that each "human-shaped golfer" represents a machine that can perform many movements and can be programmed to repeat these movements over and over again with enough practice. He also believed that categorizing each specific moment of the golf swing was important for a golfer because it allowed the golfer to isolate the problem areas, and work on each area independently. Eventually, the golfer can integrate each part of his/her golf swing into a comprehensive motion that (ideally) looks something like this (I'm a big fan of Jason Day's swing if you couldn't tell):
When trying to understand this framework for understanding the golf swing, I think it is useful to identify which chapters serve which purpose.
The 24 Components of a Golf Swing
For starters, Homer said that EVERY golf swing is comprised of 24 components. These include things like the grip, the grip type, the stance, alignments, down-swing types, etc. etc. No matter what golfer you look at, they will ALL have some variation of these 24 components.
Now, obviously, every golfer has a different looking swing, so how can every golfer be the same??
Well, that is where chapter 10 comes in. In Chapter 10, Homer introduces all the individual variations that are possible for EACH of the 24 components. This explains how every PGA Tour golf swing looks different, yet all perform so well. There is no correct combination of components. They are simply options.
RECAP: So far, we understand that each golfer acts as a programmable machine that has 24 basic components to his/her golf swing, no matter how good/bad it is. When looking at each different golf swing, we can analyze EACH of these 24 components separately (ideally through video analysis), and identify what types of variations (chapter 10) they have.
Now, we can add another layer to this beautiful mess, and say that although each golfer has a different looking swing, there are only TWO categories of golf swings: the swinger and the hitter. I have explained the difference in this post. Based on which type of golfer you are, there are certain variations (from chapter 10) that are compatible with your golf swing, while others are not. Homer has written out the compatibility of components in chapter 12, where he lays out the basic classification of a hitter's swing and a swinger's swing.
On top of all that, there are laws of physics that explain to us the most efficient and effective way to swing a golf club! Homer uses chapter 2 to explain these factors (although this is by far the most confusing chapter of the book, and I highly recommend reading the first section of my instructional content to understand it better).
RECAP: A golfer is a programmable machine that has 24 basic components, regardless of what the swing looks like. Based on the laws of physics, there are "optimal" ways to swing a golf club, primarily classified as either "swinging" or "hitting." He uses chapter 2 to explain these laws of physics, chapters 7 and 10 to explain all the components of a golf swing, and chapter 12 to classify all these components into either a "hitting motion" or "swinging motion."
What are "Educated Hands"?
Finally, Homer talks about the concept of "educated hands," which explains that no matter who you are, and what type of swing you are implementing, the key to good golf is to teach your body (specifically your hands, wrists, and forearms) the correct way to move throughout the golf swing. You should know how to "feel" different types of golf swing motions. He uses chapter 4 to explain this concept.
The remaining chapters are simply supplements that further explain Homer's theory of teaching golf and implementing the wisdom in his book effectively.
The Golfing Machine Chapter Summaries
Below is a list of the chapters, and my interpretation of their purposes:
Chapter 1 - This chapter outlines Homer's overall theory of the golf swing and the way that he believes a student should learn it. He discusses how golf should be mastered step by step, and without a clear understanding of each step, a golfer will be plagued by frustration forever. He also states in this chapter that golf was never meant to be a "simple" game: "Demanding golf instruction be kept simple does not make it simple - only incomplete and ineffective." He later explains (in a vague manner) the "machine concept" behind the book.
Chapter 2 - By far the most confusing chapter, Homer explains the physics behind his teachings and essentially proves why certain movements in the golf swing are bio-mechanically more correct than others. To anyone starting out with this book, I highly suggest skipping this chapter and coming back to it later.
Chapter 3 - Provides a brief method for practicing the golf swing, improving it over time, and executing it on the golf course. Feel is not real. You have to see your swing on video to know what is actually happening.
Chapter 4 - Discusses the independent wrist positions that you can achieve throughout the golf swing. It may seem trivial and unnecessary to learn upfront, but you will find the value in this chapter much later.
Chapter 5 - This is a short chapter that mainly discusses how important it is to learn how to manipulate the position of the golf club throughout the swing through the feel of various wrist/hand positions. For example, a golfer should never try to put the golf club in a perfect position at the top by the means of conscious manipulation, but rather learn what a perfect position at the top feels like through the process of "educating the hands."
Chapter 6 - This is one of the most important chapters of the entire book, and explains how the golf swing is powered. You will learn the differences between "swinging" and "hitting" in this chapter, as well as the sequence of accumulating, loading, storing, delivering, and releasing power through the concept of the "power package." It also talks about a method for directing the power towards the ball in the most efficient manner through the "aiming point concept." Do not expect to understand this chapter the first time through!
Chapter 7 - The foundation for The Golfing Machine... Chapter 7 goes through each of the 24 components present in EVERY golfer's swing. This chapter provides an overview of the components but does not explain the various methods for executing each component in a real golf swing.
Chapter 8 - Simply a catalog of golf swing positions which Homer references throughout the book. I'm not sure why he decided to put this information in chapter 8...
Chapter 9 - Again, this is just another way of "cataloging" the golf swing. Homer separates the golf swing into three "zones," which include the "body lane," the "arms lane," and the "hands lane." I personally never found any use for this information in understanding the rest of the book, but not a bad idea to glance over.
Chapter 10 - This is the chapter that you will constantly refer back to. It takes all 24 components that were introduced in chapter 7 and explains all the possible ways of executing each component in a real golf swing.
Chapter 11 - A summary of the entire book, and a catalog of chapter 10. If you couldn't tell by now, Homer loves categorizing things. I couldn't imagine what his home office looked like.
Chapter 12 - The SINGLE MOST IMPORTANT chapter of the book. This takes everything you have learned and attempts to describe how a golfer should actually swing a golf club. Although this chapter is hard to grasp alone, I am sure the resources I have provided below will clarify adequately.
Chapter 13 - This chapter is less than 1 page, and mainly just tells the reader that it is important to make sure that they are not mixing components that aren't compatible. For example, a "hitter" should probably not use a "dual-horizontal" hinge action (I know, this doesn't make any sense now, but it will in due time!).
Chapter 14 - A short description of Homer's comparison of the golf swing with a computer. I personally believe this should be chapter 1, but as you might have already noticed, the chapters aren't ordered all that well.
Recommended Reading Method and How to Apply TGM to Your Game
It took me 2 full years from the second I picked up The Golfing Machine to fully understand the cryptic golf text. You might ask why I went to the trouble? Well, I had heard many prominent instructors and even PGA Tour players like Bryson Dechambeau talk about it like it was the Holy Bible of Golf. I got curious and decided to put myself through months of pain to grasp what Homer Kelley was saying in that book.
Now that I finally understand the value of this book, I want to share some strategies for getting through it on your own. Below is my recommended method of reading The Golfing Machine followed by some instructions on how to apply it directly to your golf game. Enjoy!
Recommended Reading Method
Although Mr. Kelley lays out a recommended guide to reading his complex work, I believe that there is a slightly better way of doing things with all the additional resources available to the modern reader. Below is Homer's recommendation:
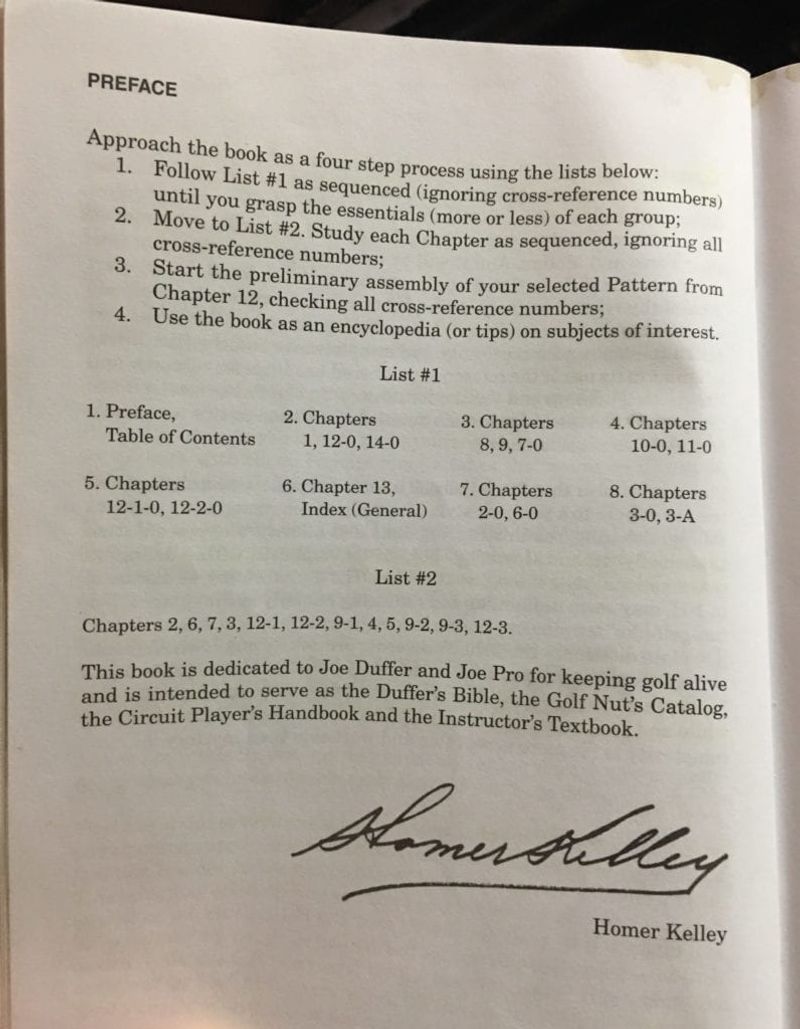
I followed this exact plan, and felt like I was losing my mind. Instead, I am about to outline a method for reading TGM that will reduce the time you spend in utter confusion, and maximize the time you spend applying the concepts to your own golf game.
Step 1: Read this entire post, which will give you a better empirical understanding of the book. Once you understand the purpose of each chapter (explained in this post), you will have a better time understanding the minute details that Homer Kelley loves to include.
Step 2: Purchase the book itself, and read in the following order (Do not skip to step 3 yet, because the act of reading the actual text will prove useful later when you review the concepts via additional resources!):
- All of Chapter 1
- All of Chapter 14
- 2-0, 2-R, 2-S, and my posts on the inclined plane and ball-flight laws (which explains much of the unnecessary jargon that exists in chapter 2 of the book).
- All of chapter 3
- All of chapter 6 (with many digressions)
- Read "Step One," and then supplement this with my post about the power accumulators, and when you reach 6-B-3-0-1, read my post on the flying wedges, followed by the all of chapter 4 (which further explains the wrist glossary from my post).
- Read the remainder of Chapter 6
- Glaze over Chapter 8 and Chapter 9, without looking too far into them. They are simply a way that Homer attempted to "classify" the golf swing, and are no more than more effective ways to communicate. Personally, I find that my swing position glossary is sufficient for communicating about the golf swing, which I have used throughout my instructional content.
- Read Chapter 7 and Chapter 10 simultaneously
- For example, read 7-1, and then immediately read 10-1. Essentially, chapter 10 corresponds exactly with chapter 7, but gets more detailed with the different variations you can have with each of the 24 components introduced in chapter 7.
- Do not worry if none of this makes sense when you first read it. The goal of reading these chapters is to be able to recognize the 24 components, but not necessarily understand them all. As Homer states, "there is more information in this book than any golfer can use in many lifetimes. But it is not difficult to know everything in this book if the chart shown in Chapter 11 is utilized and its unity, continuity and completeness is recognized."
- Skim over Chapter 11, 12, and 13
- You will come back to these frequently, but are not particularly useful until you understand everything previously written.
- Chapter 11 is basically a "catalog" of all 24 components and their 144 variations.
- Chapter 12 is the "assembly instructions" for putting together your golf swing
- Chapter 13 is rather useless in my opinion, but essentially explains that you must not include "components" which don't fit into your stroke pattern (if this sounds confusing, please don't stress about it)
- I like to think of chapter 11 and 12 in terms of the Dell Computer company. As many know, when you order a computer from Dell, they put all the parts together according to an assembly manual, and ship it out to the customer. The customer can choose different components like how much RAM memory they want, the size of the screen, hard drive memory, what type and year of model they want, whether they want a CD drive, whether they want "core i-5 or core i-7," etc. etc. Chapter 11 is the list of "parts" that a golfer can choose from, while chapter 12 is the assembly manual for putting those parts together, which lists which parts are compatible with each other (for example, you aren't going to put a massive hard drive into a tiny computer).
Step 3: Re-read the book straight through as many times as you need, supplementing it with the following resources for each particular part of the book (thanks Jeffrey Mann, Lynn Blake, and The Swing Engineer for many of these explanations). Please note that I have omitted a few of the chapters and cross-references, mainly because they are simple enough to understand without additional guidance (note: many of the links below are cross-referenced numbers, which you will be able to quickly navigate to once you have purchased the book):
- Understanding Chapter 2
- 2-A through 2-C-0, 2-D, 2-E
- 2-C-1 through 2-C-3, and 2-G (Lynn talks about "lay back" of the clubface at 3:17 in video)
- 2-F
- 2-H and 2-J
- 2-K
- Understanding Chapter 6
- Understanding Chapters 7 and 10 (The links below are numbered 1-24, and correspond to both chapter 7 and 10. For example, #10 represents the explanation of chapter 7-10 AND 10-10).
- #1-2
- #3 - This is simply explaining all the different types of golf strokes you can make. For example, Phil Mickelson's chipping style is representative of the "peck" from 10-3-f, while Jason Day chips/pitches with more of a "pitch" per 10-3-B.
- #4
- #5 - this is essentially the concept of setting up for various ball-flights. If I wanted to hit a fade, I am going to use the "open-open" setup (10-5-D). If I wanted to hit a short pitch shot, I would use the "square-open" setup (10-5-B)
- #6
- #7 - This simply states all of the different plane shifts that can happen during the golf swing. For example, Bryson Dechambeau uses a "zero" shift (10-7-A), while Jim Furyk uses the "reverse loop" shift (10-7-G).
- #8-9 - fairly intuitive - no explanation needed
- #10 - Watch this, then this, and then read this. (in that order for greatest clarity)
- #11 - this topic is closely associated with the power accumulators (see "understanding chapter 6" above)
- #12 - explains the various amounts of pivot a golfer should use with corresponding setups as described in #5
- #13-17 - The various body movements (fairly intuitive)
- #18 - closely associated with the hinge actions described in #10
- #19 - also closely associated with power accumulators (see "understanding chapter 6" above), and the "Basic Motion." Also see Jeffrey Mann's analysis of this topic.
- #20-24 - closely associated with the power accumulators (see "understanding chapter 6" above)
- Understanding Chapter 12
- The Basic Motion (12-5-1) (part 1 and part 2)
- The Acquired Motion (12-5-2)
- The Total Motion (12-5-3)
- The Full Swing
Step 4: Get working on your basic motion!!! From what I've noticed in my many years of playing golf, 99% of golfers have a faulty basic motion, therefore, I am suggesting this as a starting point. After you have mastered the basic motion, you can move on to building the rest of your golf swing!
Applying The Golfing Machine to your Game
With a book so complex by nature, it often begs the question as to how one can make this knowledge useful for their own game? Homer specifically states in the book that there is far too much information in the book for one golfer to apply across his/her entire game, so where do we even start?
After personally experimenting around with many of the concepts, I have come up with a basic framework for understanding and implementing the knowledge in this book to my own game. Below is a quick summary that will hopefully aid you in your process:
Swinging vs. Hitting
Now, if you go online and read about The Golfing Machine long enough, you'll realize that swinging and hitting is not quite as black and white as Homer Kelley first stated. That being said, we must give some credence to the idea, and decide which type of golf swing more closely resembles our own games.
The reason I find it useful to determine which type of golf you are is primarily for the one-arm drill that I do around the chipping green. Since I would classify myself under the "swinging" category, I will hit 10 yard pitch shots with only my left arm several times a week. If you were a "hitter," I would recommend hitting pitch shots with only your right hand, maintaining the flying wedges through impact.
Additionally, once you know which type of golfer you are, you can then pair this with backswing types and release actions.
Release (hinge) Actions
The second thing that I recommend doing is working on all three hinge actions:
Teach your body the differences between them. After you have become comfortable with all three, you will be amazed at how many possibilities open up for you on the golf course; especially around the greens.
For example, if I want to hit a cut shot, I will use angled hinging (since I use a "swinging" motion with a neutral grip, this produces a cut spin on the ball with a normal setup). Another application would be the use of vertical hinging when I want to hit a high, soft pitch shot to a short-sided pin.
**Distinction: One thing that I must note is that Homer Kelley recommends that the "swinger" use horizontal hinging, while the "hitter" use angled hinging, as these are "natural" given these swing types. Although these are helpful guidelines, they are not absolute rules to follow. Get creative and experiment with different combinations on your own!
Work on your "optimal plane"
I have written a post on the optimal plane which explains this in more detail.
Experiment with Power Accumulators around the greens
Another useful application from the book can be found around the greens. By eliminating (or "zeroing out" as Homer calls it) certain power accumulators, you can add a layer of finesse to your short game.
For example, when hitting bump and runs, I will completely eliminate the third power accumulator, which tightens the dispersion on my shots significantly. Per 6-B-3-B in the text, zeroing out this accumulator simply means using a "low power" grip as I explain in this post.
Summary
I couldn't possibly cover everything that I wanted to in this short booklet, but I hope that it has been helpful to anyone looking to understand The Golfing Machine in greater detail. By no means will the read be "easy," but at least with the resources listed herein, you will be better equipped to decipher Homer's esoteric vernacular throughout the book.